# Microsoft Dev Tunnels as C2 Channel

Background

This article provides an introduction to utilizing Microsoft's [Dev Tunnels](https://learn.microsoft.com/en-us/azure/developer/dev-tunnels/overview) as a C2 (Command and Control) channel.

## Setting up the dev tunnels

Begin by downloading the most recent version of the dev tunnels from Microsoft, available for both [Linux and Windows](https://learn.microsoft.com/en-us/azure/developer/dev-tunnels/get-started?tabs=macos) versions. Upon successful download of the dev tunnels binary, execution is as follows:

<figure><img src="https://3629422832-files.gitbook.io/~/files/v0/b/gitbook-x-prod.appspot.com/o/spaces%2Fhc07wjSjeLaJUxQVJfIF%2Fuploads%2Fn29jjxJcGH9QpBQisJHM%2Fimage.png?alt=media&#x26;token=9ff52cb7-1d0d-452d-a8c5-334a71b6daf9" alt=""><figcaption></figcaption></figure>

To use the dev tunnels, you will have to sign in with your Azure Active Directory (AAD) or GitHub account. In my example, I'll authenticate using my GitHub account with the `-g` flag and utilize device code authentication with the `-d` flag.

<figure><img src="https://3629422832-files.gitbook.io/~/files/v0/b/gitbook-x-prod.appspot.com/o/spaces%2Fhc07wjSjeLaJUxQVJfIF%2Fuploads%2FHyQ56MO0t6iPHdxpKelq%2Fimage.png?alt=media&#x26;token=0ad13f38-98e4-449e-852a-305071b31119" alt=""><figcaption></figcaption></figure>

Following this, a device code will be generated. Simply enter the provided device code link into your web browser to authenticate.

<figure><img src="https://3629422832-files.gitbook.io/~/files/v0/b/gitbook-x-prod.appspot.com/o/spaces%2Fhc07wjSjeLaJUxQVJfIF%2Fuploads%2FasjZK1AKAI1O3GKU8TIR%2Fimage.png?alt=media&#x26;token=ed8b8d58-930d-4a68-b14e-8ddea695cc9e" alt=""><figcaption></figcaption></figure>

<figure><img src="https://3629422832-files.gitbook.io/~/files/v0/b/gitbook-x-prod.appspot.com/o/spaces%2Fhc07wjSjeLaJUxQVJfIF%2Fuploads%2FhFRBJtuxZttVMNa4tbOk%2Fimage.png?alt=media&#x26;token=b82dd6e3-08d8-4267-858e-fc7ed98af86b" alt=""><figcaption></figcaption></figure>

You can initiate the dev tunnels using the specified commands. Importantly, the `--allow-anonymous` flag allows anonymous clients to access your page.

`./linux-x64-devtunnel create --allow-anonymous`

<figure><img src="https://3629422832-files.gitbook.io/~/files/v0/b/gitbook-x-prod.appspot.com/o/spaces%2Fhc07wjSjeLaJUxQVJfIF%2Fuploads%2FiW1y5lFwVKPdQ3JT62cI%2Fimage.png?alt=media&#x26;token=2276fa84-1b20-4367-84c5-3108b2c3be7d" alt=""><figcaption></figcaption></figure>

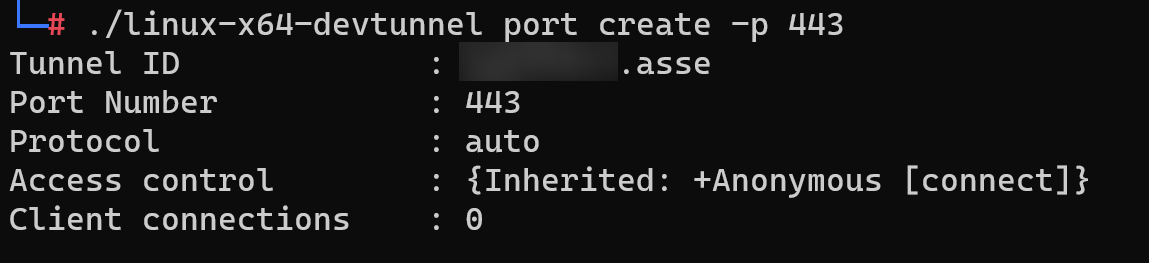
Upon generating a tunnel ID, you can allocate a port to it, such as 443.

`./linux-x64-devtunnel port create -p 443`

<figure><img src="https://3629422832-files.gitbook.io/~/files/v0/b/gitbook-x-prod.appspot.com/o/spaces%2Fhc07wjSjeLaJUxQVJfIF%2Fuploads%2FNN4sX1NzQBlx6ysPAW9Y%2Fimage.png?alt=media&#x26;token=a3d0ae59-ae07-442f-add5-58d5b7059386" alt=""><figcaption></figcaption></figure>

After all configurations are in place, employ the following command to host the dev tunnels service:

`./linux-x64-devtunnel host <tunnel id>`

<figure><img src="https://3629422832-files.gitbook.io/~/files/v0/b/gitbook-x-prod.appspot.com/o/spaces%2Fhc07wjSjeLaJUxQVJfIF%2Fuploads%2FnsjxW5UaGtsxV4DsRSbL%2Fimage.png?alt=media&#x26;token=8e2a3f6f-0500-4af4-bd11-df817693989a" alt=""><figcaption></figcaption></figure>

## Bypass the Microsoft dev tunnels confirmation page

Upon attempting to access the dev tunnels link via a browser, you might encounter the following confirmation page.&#x20;

<figure><img src="https://3629422832-files.gitbook.io/~/files/v0/b/gitbook-x-prod.appspot.com/o/spaces%2Fhc07wjSjeLaJUxQVJfIF%2Fuploads%2FSzgosnbgPOKuPqqZOWcq%2Fimage.png?alt=media&#x26;token=5706aa62-1fe5-4dbb-8fcd-2edf36e64b6a" alt=""><figcaption></figcaption></figure>

A trick to enable your C2 to bypass this confirmation page is to ensure your C2 HTTP request does not contain `Accept` header or simply remove `text/html` from the `Accept` header.

<figure><img src="https://3629422832-files.gitbook.io/~/files/v0/b/gitbook-x-prod.appspot.com/o/spaces%2Fhc07wjSjeLaJUxQVJfIF%2Fuploads%2FQSu1qyysfOxWb7mUgpp1%2Fimage.png?alt=media&#x26;token=05e7d9fc-3145-44fe-8cc6-819b8e80134f" alt=""><figcaption></figcaption></figure>

## Setting up C2 listener

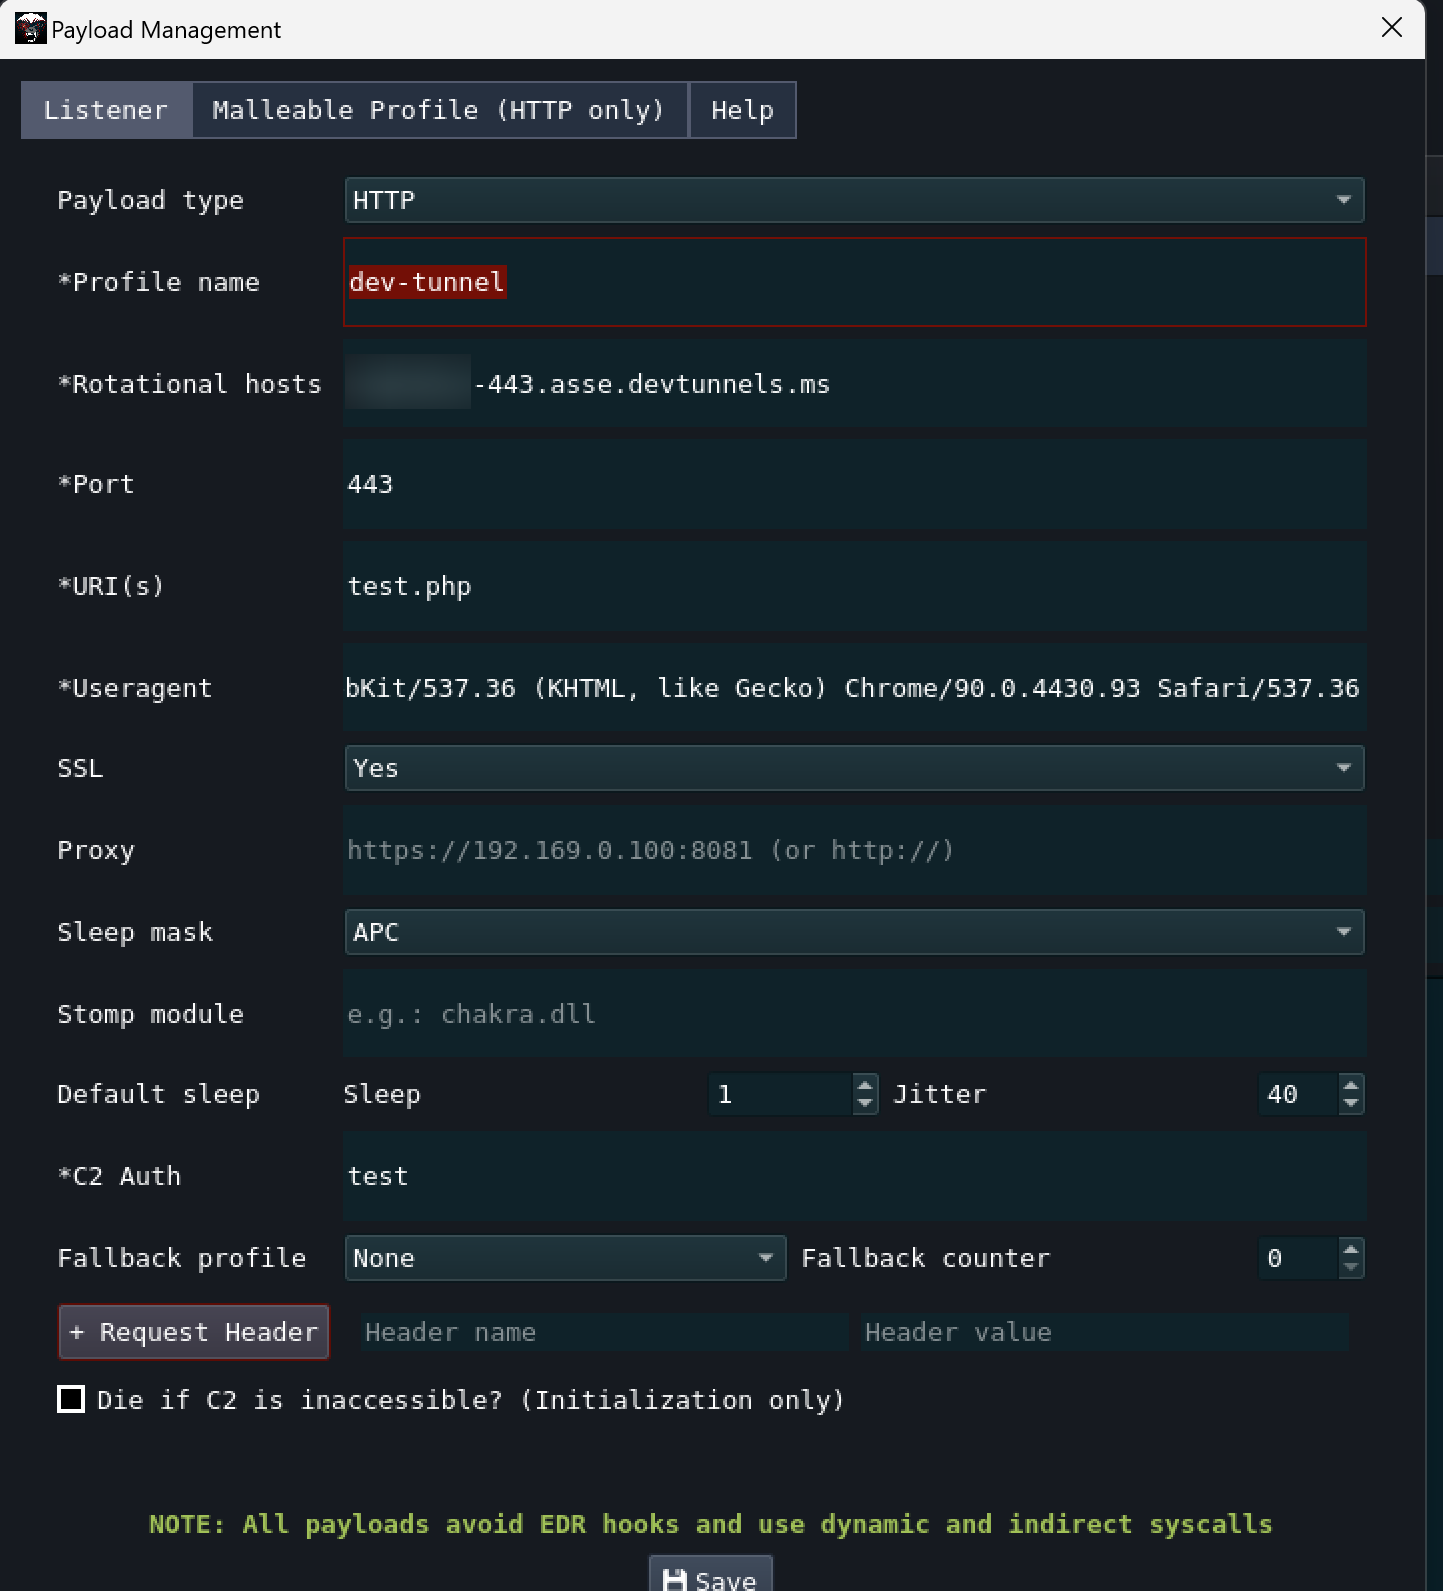
With the dev tunnels active, proceed to integrate your preferred C2 on the same host machine. As an illustration, I'll be utilizing Brute Ratel for C2 and setting up the listener as below:

{% hint style="info" %}
The Dev Tunnel is designed to forward all traffic to your localhost port. As such, it's important to ensure that your C2 listener binds to the localhost port.
{% endhint %}

<figure><img src="https://3629422832-files.gitbook.io/~/files/v0/b/gitbook-x-prod.appspot.com/o/spaces%2Fhc07wjSjeLaJUxQVJfIF%2Fuploads%2FH62huJx4eC9LlqCXbP3v%2Fimage.png?alt=media&#x26;token=cf5362b9-c9b2-48b0-923e-7c302feec84c" alt=""><figcaption></figcaption></figure>

Depending on the specific C2 in use, it might be necessary to establish an appropriate payload profile so that your shellcode will connect to the dev tunnels URL instead of localhost.

<figure><img src="https://3629422832-files.gitbook.io/~/files/v0/b/gitbook-x-prod.appspot.com/o/spaces%2Fhc07wjSjeLaJUxQVJfIF%2Fuploads%2Fg1ZtYTF8ljuU56yymsAU%2Fimage.png?alt=media&#x26;token=3a540973-6539-429c-9a12-6cb927ee9263" alt=""><figcaption></figcaption></figure>

Once the listener is appropriately configured, use your loader of choice to run your shellcode. This will establish a C2 connection under the domain`devtunnels.ms.`

<figure><img src="https://3629422832-files.gitbook.io/~/files/v0/b/gitbook-x-prod.appspot.com/o/spaces%2Fhc07wjSjeLaJUxQVJfIF%2Fuploads%2F7QWwtlJIW7g7BM3vTnDV%2Fimage.png?alt=media&#x26;token=0319c814-f09c-41db-901a-b0e797e60341" alt=""><figcaption></figcaption></figure>

## Reference

{% embed url="<https://learn.microsoft.com/en-us/azure/developer/dev-tunnels/cli-commands>" %}
